

简介
特征:
- 支持SSH密码认证,包括空密码。
- 支持 SSH 公钥认证,包括 DSA RSA ECDSA Ed25519 密钥。
- 支持加密密钥。
- 支持两因素身份验证(基于时间的一次性密码)。
- 支持全屏终端。
- 终端窗口可调整大小。
- 自动检测 ssh 服务器的默认编码。
- 支持现代浏览器,包括 Chrome、Firefox、Safari、Edge、Opera。
安装与使用
要求
Python 2.7/3.4+
快速开始
安装这个应用程序,运行命令 pip3 install webssh
启动一个网络服务器,运行命令 wssh
打开浏览器,导航到 127.0.0.1:8888
输入您的数据,提交表格。
自定义字体
要使用自定义字体,请将您的字体文件放在目录中webssh/static/css/fonts/并重新启动服务器。
然而这个webssh/static/css/fonts/目录我找了半天才找到。
有个小技巧。安装完成以后在次运行 pip3 install webssh 即可看到安装目录了。
如下:
$ pip3 install webssh [23:22:21] Requirement already satisfied: webssh in /usr/local/lib/python3.9/site-packages (1.5.3) Requirement already satisfied: paramiko>=2.3.1 in /usr/local/lib/python3.9/site-packages (from webssh) (2.7.2) Requirement already satisfied: tornado>=4.5.0 in /usr/local/lib/python3.9/site-packages (from webssh) (6.1) Requirement already satisfied: pynacl>=1.0.1 in /usr/local/lib/python3.9/site-packages (from paramiko>=2.3.1->webssh) (1.4.0) Requirement already satisfied: bcrypt>=3.1.3 in /usr/local/lib/python3.9/site-packages (from paramiko>=2.3.1->webssh) (3.2.0) Requirement already satisfied: cryptography>=2.5 in /usr/local/lib/python3.9/site-packages (from paramiko>=2.3.1->webssh) (3.4.7) Requirement already satisfied: six>=1.4.1 in /usr/local/lib/python3.9/site-packages (from bcrypt>=3.1.3->paramiko>=2.3.1->webssh) (1.16.0) Requirement already satisfied: cffi>=1.1 in /usr/local/lib/python3.9/site-packages (from bcrypt>=3.1.3->paramiko>=2.3.1->webssh) (1.14.5) Requirement already satisfied: pycparser in /usr/local/lib/python3.9/site-packages (from cffi>=1.1->bcrypt>=3.1.3->paramiko>=2.3.1->webssh) (2.20) 那么我就到这个目录去找就行了。/usr/local/lib/python3.9/site-packages
我的电脑上最终找到存放字体的目录是:/usr/local/lib/python3.9/site-packages/webssh/static/css/fonts
因为我在vim中使用Hack Nerd Font字体,所以我把字体放进来。
我的路径如下:
itkey@ycmit: /usr/local/lib/python3.9/site-packages/webssh/static/css/fonts $ ls font.ttf 然后重启wssh,然而在我的电脑上字体并没有变。我直接把电脑重启后,发现我的字体终于生效了。
服务后台运行
nohup wssh --address='127.0.0.1' --port=8888 --policy=reject > webssh.out 2>&1 & tail -f webssh.out RSA key fingerprint is SHA256:emsKYigxkpR1CUTyuEJIyXUkHpIuG/fQ8wPiM1IOlp0. RSA key fingerprint is MD5:43:dd:8d:c2:1c:29:f2:bd:68:c2:d8:f0:3b:b6:60:af. Are you sure you want to continue connecting (yes/no)? 因为我把webssh当作一个跨平台的ssh工具使用的,所以我喜欢默认允许(yes),这样的安全性会降低,但是使用起来方便。--policy=autoadd
nohup wssh --address='127.0.0.1' --port=8888 --policy=autoadd > webssh.out 2>&1 & tail -f webssh.out 插件冲突提醒
nginx中食用
直接映射到根目录
我的配置如下:
server {
    listen 80; server_name ssh.xxxx.cn; # Nginx config example location / {
    proxy_pass http://127.0.0.1:8888; proxy_http_version 1.1; proxy_read_timeout 300; proxy_set_header Upgrade $http_upgrade; proxy_set_header Connection "upgrade"; proxy_set_header Host $http_host; proxy_set_header X-Real-IP $remote_addr; proxy_set_header X-Real-PORT $remote_port; } error_page 404 /404.html; location = /404.html {
    } error_page 500 502 503 504 /50x.html; location = /50x.html {
    } }
映射虚拟目录
location /ssh/ {
proxy_pass http://127.0.0.1:8888/; proxy_http_version 1.1; proxy_read_timeout 300; proxy_set_header Upgrade $http_upgrade; proxy_set_header Connection "upgrade"; proxy_set_header Host $http_host; proxy_set_header X-Real-IP $remote_addr; proxy_set_header X-Real-PORT $remote_port; } 特别提醒:proxy_pass http://127.0.0.1:8888/; 这个端口后面的/斜杠不要少,否则会显示404.
查看了大量的文章后才找到解决办法。
最终对我有用的文章是:
https://github.com/quaggalinux/linux_webssh
浏览器console登录
每次都输入用户名密码登录,会显的比较麻烦。还有一种登录方式,就是在浏览器的console执行命令登录。写法如下:
// connect to your ssh server wssh.connect(hostname, port, username, password, privatekey, passphrase, totp); // pass an object to wssh.connect var opts = {
    hostname: 'hostname', port: 'port', username: 'username', password: 'password', privatekey: 'the private key text', passphrase: 'passphrase', totp: 'totp' }; wssh.connect(opts); // without an argument, wssh will use the form data to connect wssh.connect(); // set a new encoding for client to use wssh.set_encoding(encoding); // reset encoding to use the default one wssh.reset_encoding(); // send a command to the server wssh.send('ls -l');
示例:
- 在浏览器中打开webssh的地址
- 以chrome为例,鼠标右击,菜单中选“检查”,切换到console页
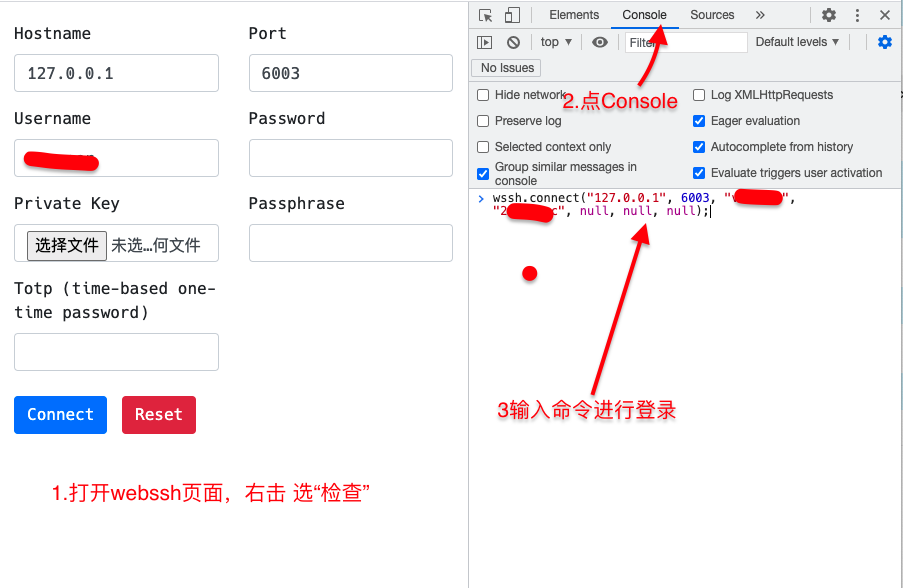
用户名密码登录
wssh.connect("127.0.0.1", 6003, "username", "password", null, null, null); 这样就不用,每次都输入用户名密码了,一条命令搞定。
URL 传参登录
http://localhost:8888/?hostname=xx&username=yy&password=str_base64_encoded http://ssh.xxx.cn/?hostname=127.0.0.1&port=6003&username=用户名&password=base64加密后的 ModuleNotFoundError: No module named ‘setuptools_rust‘
使用一段时间后体验
- 非常强大,兼容性好,跨平台。有浏览器的地方就可以ssh,有ssh就可以为所欲为。
- 字体支持很好,Hack Nerd Font完美支持,我在windows中找了很久可以完美支持Hack Nerd Font的ssh客户端软件至今没有找到。因为我在vim中大量使用这个字体,所以我现在在windows中甚至使用的就是webssh
- 操作流畅度仅够用,在一些场景下会卡顿,比如:vim中多窗格时,窗格大写调整时会卡顿。快速移动光标时偶尔也会卡顿。流畅度比起传统的终端模拟器还是有非常明显的差距的。
总体来说还是很强的。我在云服务器上部署了一个,以后可以随时随地,只要是一个可以上网的设备,我就可以使用vim编程开发了。一个web 链接就是我的云电脑了。
总结
强!太强了!web版本的ssh竟然可以如此之强。远远超出我的想像!!!
发布者:全栈程序员-站长,转载请注明出处:https://javaforall.net/203908.html原文链接:https://javaforall.net


