
简介
Airtest Project 是为编写自动化脚本,达到提升测试效率的一整套解决方案。它可以轻松的扩展到多平台、多引擎上;如基础的 Android和IOS手机应用、App;Windows上的应用等。
学习使用 Airtest Project 很容易,由于 Airtest Project 是基于Python的,只需要会一点基础的 Python 基础知识即可。Airtest Project 需要一个开发环境,推荐使用配套的 AirtestIDE;AirtestIDE针对于 Airtest Project 有一些特殊的功能,使用别的环境可能会让你开发时工作繁琐,效率降低等。
Airtest Project 包含了两个框架,一个是 Airtest 一个是 Poco,这两个框架都是Python 的第三方库。在开发过程中,可以在开发时引入其它库加强你的脚本。
Airtest 可实现“即看见可操作”,但是对文本内容的获取缺无能为力;这一点在官方文档中也有说明。这一点缺点也有解决办法:可通过引入文字识别库进行补缺,如:pytesseract。
使用 Airtest 进行自动化测试时,操作流程一般为:图片截取 → 图片对比 → 相似度与设定值对比 → 找出坐标位置 → 点击。默认情况下 Airtest 对于不同颜色的对比并不敏感,需要开启颜色对比。
在测试对象非原生App或无法取得项目源码时使用 Airtest 进行测试是个很好的选择。
在已有项目源码或测试对象为原生App时使用Poco进行自动化测试,不仅满足可对文本的获取,而且相比 Airtest 更为简洁!本篇只讲解 Airtest 的操作。
使用 AirtestIDE 将极大的简便我们的开发过程,对开发者非常友好。提供了截图及截图预览、可连接设备自动读取、高亮的编辑界面、脚本录制、支持设备远程连接并且在嵌入设备对象窗口实时刷新。
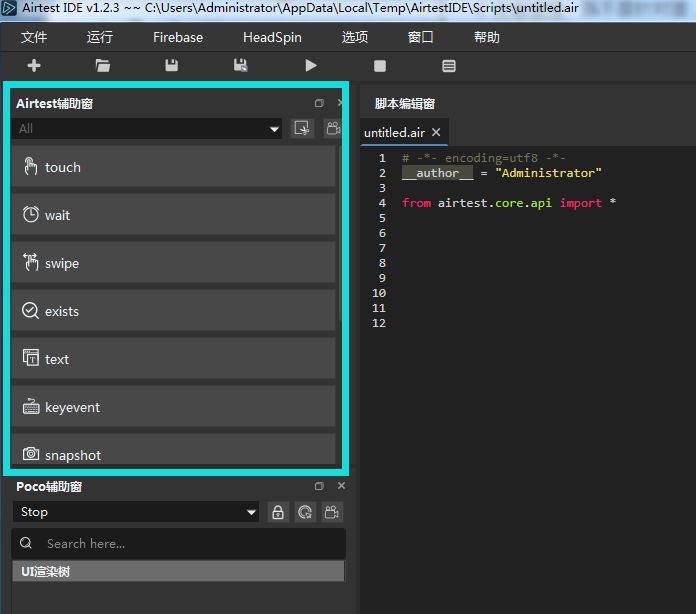
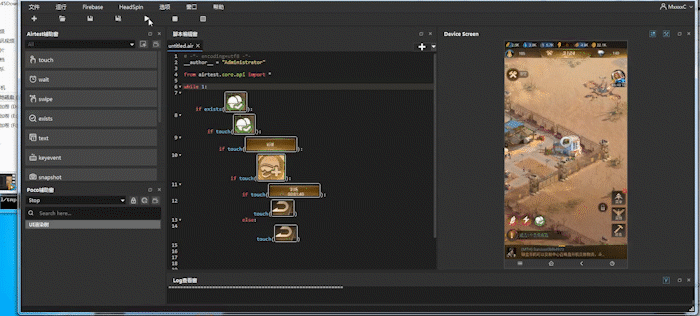
界面
连接
尝试
# -*- encoding=utf8 -*- __author__ = "Administrator" from airtest.core.api import * 其中 from airtest.core.api import * 将Airtest的基本API引入,为之后编写做好准备。
查看可视窗口最左侧,有Airtest辅助窗与Poco辅助窗,本篇主要讲解Airtest。

首先尝试第一个操作touch,touch中文译为“触摸”,从命名上得知,这是个可实现“触碰”功能的操作。首先鼠标悬浮在 touch 选项处:

将会提示 touch 功能的相关信息,现在简单的尝试一下 touch 功能。
点击 touch ,把鼠标移动到设备窗,找到你想要实现点击的按钮,点下左键不放,进行拖拽选中,随后放手。
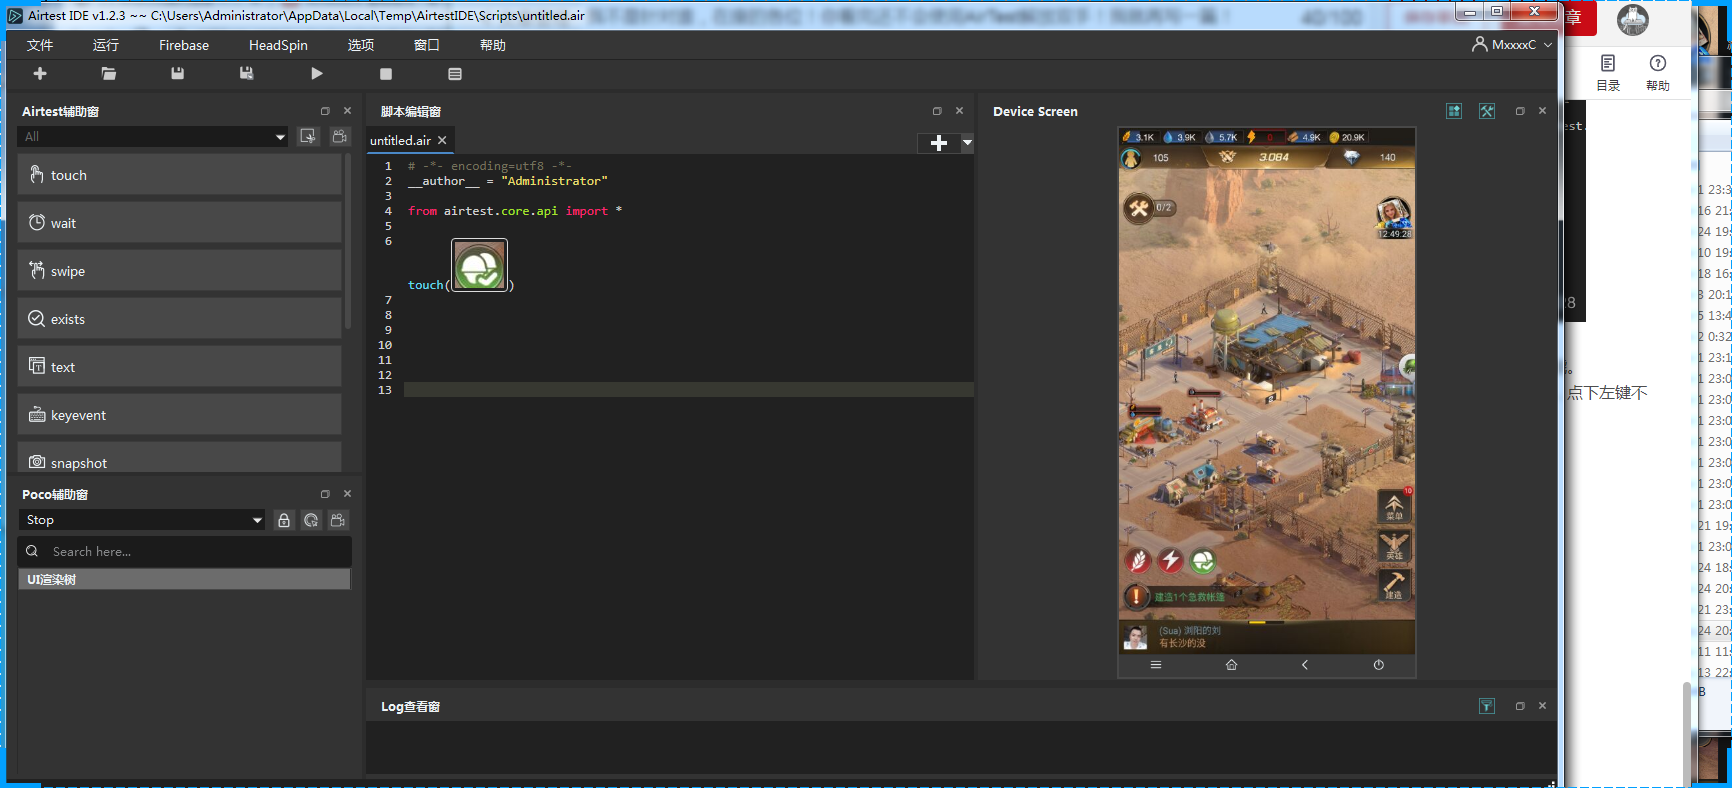
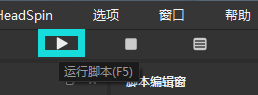
这时,代码编辑区将会出现 touch('你所选中的图片'),点击运行脚本,尝试使用:
运行效果如下:
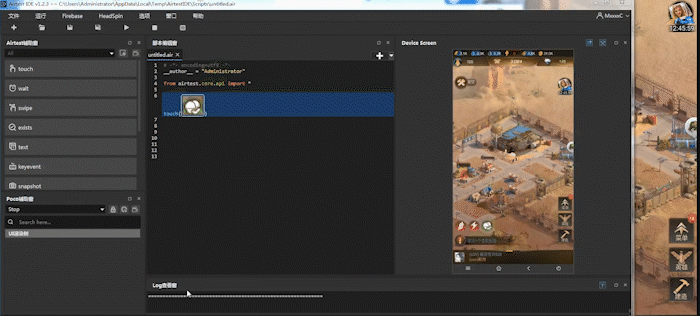
从效果中可以看到 touch 将会找到与我们所选中的图形相似的图案,进行计算匹配,达到匹配的要求后,进行点击操作。
浅剖析
# -*- encoding=utf8 -*- __author__ = "Administrator" from airtest.core.api import * touch(Template(r"tpl50.png", record_pos=(-0.217, 0.565), resolution=(540, 960))) 在不经过 AirtestIDE 处理的代码中,图片的表现形式为路径,以及使用了 Template 作为处理,此处,Template 函数接收3个函数,分别为:图片路径\record_pos以及resolution。
在 Airtest api 文档中查询 Template 方法。

查看文档的值,刚刚使用的Template将会直接使用参数初始化一个类。
其中参数查看文档得知:
- filename:文件路径
- threshold:图像识别阈值,是用来判定一张图片识别是否成功的阈值,例如一张图片识别到的匹配度是0.65,而我们设置的threshold为0.7的话,Airtest会认为匹配失败,从而进行下一次匹配。
- target_pos:图像点击位置,当识别出一张图像后,Airtest将会默认去点击图像的正中心位置,有时我们希望它识别出图片后点击其他位置,可以通过修改target_pos属性来实现。
- rgb:切换彩色与灰度识别,在识别图像时,Airtest会先将图像转为灰度图再进行识别。因此假如有两个按钮,形状内容相同,只有颜色不同的情况下,Airtest将认为它们都是相同内容。
通过勾选rgb选项,或在代码中加入rgb=True,可以强制指定使用彩色图像进行识别。
其中参数,还差 record_pos 与 resolution;以下为Template类,查看文档得知: - resolution:录制时的屏幕分辨率
- record_pos:录制时屏幕上的坐标
class Template(object): """ picture as touch/swipe/wait/exists target and extra info for cv match filename: pic filename target_pos: ret which pos in the pic record_pos: pos in screen when recording resolution: screen resolution when recording rgb: 识别结果是否使用rgb三通道进行校验. """ def __init__(self, filename, threshold=None, target_pos=TargetPos.MID, record_pos=None, resolution=(), rgb=False): self.filename = filename self._filepath = None self.threshold = threshold or ST.THRESHOLD self.target_pos = target_pos self.record_pos = record_pos self.resolution = resolution self.rgb = rgb @property def filepath(self): if self._filepath: return self._filepath for dirname in G.BASEDIR: filepath = os.path.join(dirname, self.filename) if os.path.isfile(filepath): self._filepath = filepath return self._filepath return self.filename def __repr__(self): filepath = self.filepath if PY3 else self.filepath.encode(sys.getfilesystemencoding()) return "Template(%s)" % filepath def match_in(self, screen): match_result = self._cv_match(screen) G.LOGGING.debug("match result: %s", match_result) if not match_result: return None focus_pos = TargetPos().getXY(match_result, self.target_pos) return focus_pos def match_all_in(self, screen): image = self._imread() image = self._resize_image(image, screen, ST.RESIZE_METHOD) return self._find_all_template(image, screen) @logwrap def _cv_match(self, screen): # in case image file not exist in current directory: image = self._imread() image = self._resize_image(image, screen, ST.RESIZE_METHOD) ret = None for method in ST.CVSTRATEGY: # get function definition and execute: func = MATCHING_METHODS.get(method, None) if func is None: raise InvalidMatchingMethodError("Undefined method in CVSTRATEGY: '%s', try 'kaze'/'brisk'/'akaze'/'orb'/'surf'/'sift'/'brief' instead." % method) else: ret = self._try_match(func, image, screen, threshold=self.threshold, rgb=self.rgb) if ret: break return ret @staticmethod def _try_match(func, *args, **kwargs): G.LOGGING.debug("try match with %s" % func.__name__) try: ret = func(*args, **kwargs).find_best_result() except aircv.NoModuleError as err: G.LOGGING.debug("'surf'/'sift'/'brief' is in opencv-contrib module. You can use 'tpl'/'kaze'/'brisk'/'akaze'/'orb' in CVSTRATEGY, or reinstall opencv with the contrib module.") return None except aircv.BaseError as err: G.LOGGING.debug(repr(err)) return None else: return ret def _imread(self): return aircv.imread(self.filepath) def _find_all_template(self, image, screen): return TemplateMatching(image, screen, threshold=self.threshold, rgb=self.rgb).find_all_results() def _find_keypoint_result_in_predict_area(self, func, image, screen): if not self.record_pos: return None # calc predict area in screen image_wh, screen_resolution = aircv.get_resolution(image), aircv.get_resolution(screen) xmin, ymin, xmax, ymax = Predictor.get_predict_area(self.record_pos, image_wh, self.resolution, screen_resolution) # crop predict image from screen predict_area = aircv.crop_image(screen, (xmin, ymin, xmax, ymax)) if not predict_area.any(): return None # keypoint matching in predicted area: ret_in_area = func(image, predict_area, threshold=self.threshold, rgb=self.rgb) # calc cv ret if found if not ret_in_area: return None ret = deepcopy(ret_in_area) if "rectangle" in ret: for idx, item in enumerate(ret["rectangle"]): ret["rectangle"][idx] = (item[0] + xmin, item[1] + ymin) ret["result"] = (ret_in_area["result"][0] + xmin, ret_in_area["result"][1] + ymin) return ret def _resize_image(self, image, screen, resize_method): """模板匹配中,将输入的截图适配成 等待模板匹配的截图.""" # 未记录录制分辨率,跳过 if not self.resolution: return image screen_resolution = aircv.get_resolution(screen) # 如果分辨率一致,则不需要进行im_search的适配: if tuple(self.resolution) == tuple(screen_resolution) or resize_method is None: return image if isinstance(resize_method, types.MethodType): resize_method = resize_method.__func__ # 分辨率不一致则进行适配,默认使用cocos_min_strategy: h, w = image.shape[:2] w_re, h_re = resize_method(w, h, self.resolution, screen_resolution) # 确保w_re和h_re > 0, 至少有1个像素: w_re, h_re = max(1, w_re), max(1, h_re) # 调试代码: 输出调试信息. G.LOGGING.debug("resize: (%s, %s)->(%s, %s), resolution: %s=>%s" % ( w, h, w_re, h_re, self.resolution, screen_resolution)) # 进行图片缩放: image = cv2.resize(image, (w_re, h_re)) return image 通过以上分析的值,在代码:
touch(Template(r"tpl50.png", record_pos=(-0.217, 0.565), resolution=(540, 960))) 其中 resolution 为当前设备的分辨率为:540, 960;可是这和我设置的分辨率不一样,查看文档得知:“在使用不同分辨率的设备进行图像识别时,可能会导致识别成功率不佳,因此Airtest提供了默认的分辨率适配规则”。从中也得到了些许信息,如“使用缩放后是否不精确?”,当然,文档也给出了解决方案:“想要提高2d游戏的识别精度,最好的办法就是明确指定你的游戏的分辨率适配规则;下面的代码指定了一个自定义的缩放规则:直接return原来的值,不管屏幕分辨率,所有UI都不进行缩放。”,
代码如下:
from airtest.core.api import * def custom_resize_method(w, h, sch_resolution, src_resolution): return int(w), int(h) # 替换默认的RESIZE_METHOD ST.RESIZE_METHOD = custom_resize_method 这里的RESIZE_METHOD,即我们定义的custom_resize_method使用的输入参数为:
- w, h # 录制下来的UI图片的宽高
- sch_resolution # 录制时的屏幕分辨率
- src_resolution # 回放时的屏幕分辨率
以上分析得知,通过Template示例后一个对象,作为参数传给touch方法,那么touch方法应该进行剩下的图片查找及触摸操作;继续分析touch方法。
- 一个目标,这个目标可以是 Template 的实例或者是一个坐标;
- 执行多少次点击
- 按照平台的不同所需的不同参数
- 最终返回位点击的坐标
- 适用平台为 Android, 、Windows 、iOS
点击源代码查看实现:
@logwrap def touch(v, times=1, **kwargs): """ Perform the touch action on the device screen :param v: target to touch, either a Template instance or absolute coordinates (x, y) :param times: how many touches to be performed :param kwargs: platform specific `kwargs`, please refer to corresponding docs :return: finial position to be clicked :platforms: Android, Windows, iOS """ if isinstance(v, Template): pos = loop_find(v, timeout=ST.FIND_TIMEOUT) else: try_log_screen() pos = v for _ in range(times): G.DEVICE.touch(pos, **kwargs) time.sleep(0.05) delay_after_operation() return pos import time import sys import os import six import traceback from airtest.core.settings import Settings as ST from airtest.utils.logwraper import Logwrap, AirtestLogger from airtest.utils.logger import get_logger class G(object): """Represent the globals variables""" BASEDIR = [] LOGGER = AirtestLogger(None) LOGGING = get_logger("airtest.core.api") SCREEN = None DEVICE = None DEVICE_LIST = [] RECENT_CAPTURE = None RECENT_CAPTURE_PATH = None CUSTOM_DEVICES = {
} @classmethod def add_device(cls, dev): """ Add device instance in G and set as current device. Examples: G.add_device(Android()) Args: dev: device to init Returns: None """ cls.DEVICE = dev cls.DEVICE_LIST.append(dev) @classmethod def register_custom_device(cls, device_cls): cls.CUSTOM_DEVICES[device_cls.__name__.lower()] = device_cls """ helper functions """ def set_logdir(dirpath): """set log dir for logfile and screenshots. Args: dirpath: directory to save logfile and screenshots Returns: """ if not os.path.exists(dirpath): os.mkdir(dirpath) ST.LOG_DIR = dirpath G.LOGGER.set_logfile(os.path.join(ST.LOG_DIR, ST.LOG_FILE)) def log(arg, trace=""): """ Insert user log, will be displayed in Html report. :param data: log message or Exception :param trace: log traceback if exists, use traceback.format_exc to get best format :return: None """ if G.LOGGER: if isinstance(arg, Exception): G.LOGGER.log("info", {
"name": arg.__class__.__name__, "traceback": ''.join(traceback.format_exception(type(arg), arg, arg.__traceback__)) }) elif isinstance(arg, six.string_types): G.LOGGER.log("info", {
"name": arg, "traceback": trace}, 0) else: raise TypeError("arg must be Exception or string") def logwrap(f): return Logwrap(f, G.LOGGER) def device_platform(device=None): if not device: device = G.DEVICE return device.__class__.__name__ def using(path): if not os.path.isabs(path): abspath = os.path.join(ST.PROJECT_ROOT, path) if os.path.exists(abspath): path = abspath G.LOGGING.debug("using path: %s", path) if path not in sys.path: sys.path.append(path) G.BASEDIR.append(path) def import_device_cls(platform): """lazy import device class""" platform = platform.lower() if platform in G.CUSTOM_DEVICES: cls = G.CUSTOM_DEVICES[platform] elif platform == "android": from airtest.core.android.android import Android as cls elif platform == "windows": from airtest.core.win.win import Windows as cls elif platform == "ios": from airtest.core.ios.ios import IOS as cls elif platform == "linux": from airtest.core.linux.linux import Linux as cls else: raise RuntimeError("Unknown platform: %s" % platform) return cls def delay_after_operation(): time.sleep(ST.OPDELAY) 其实在这里,已经注册过了设备,默认的编辑窗口已经隐藏了这个过程,我们点击新建文件可以看到 auto_steup(),该方法实现在 airtest.core.api 中,其中auto_steup()方法定义如下:
def auto_setup(basedir=None, devices=None, logdir=None, project_root=None): """ Auto setup running env and try connect android device if not device connected. """ if devices: for dev in devices: connect_device(dev) elif not G.DEVICE_LIST: try: connect_device("Android:///") except IndexError: pass if basedir: if os.path.isfile(basedir): basedir = os.path.dirname(basedir) if basedir not in G.BASEDIR: G.BASEDIR.append(basedir) if logdir: set_logdir(logdir) if project_root: ST.PROJECT_ROOT = project_root def connect_device(uri): """ Initialize device with uri, and set as current device. :param uri: an URI where to connect to device, e.g. `android://adbhost:adbport/serialno?param=value¶m2=value2` :return: device instance :Example: * ``android:///`` # local adb device using default params * ``android://adbhost:adbport/?cap_method=javacap&touch_method=adb`` # remote device using custom params * ``windows:///`` # local Windows application * ``ios:///`` # iOS device """ d = urlparse(uri) platform = d.scheme host = d.netloc uuid = d.path.lstrip("/") params = dict(parse_qsl(d.query)) if host: params["host"] = host.split(":") dev = init_device(platform, uuid, params) return dev def init_device(platform="Android", uuid=None, kwargs): """ Initialize device if not yet, and set as current device. :param platform: Android, IOS or Windows :param uuid: uuid for target device, e.g. serialno for Android, handle for Windows, uuid for iOS :param kwargs: Optional platform specific keyword args, e.g. `cap_method=JAVACAP` for Android :return: device instance """ cls = import_device_cls(platform) dev = cls(uuid, kwargs) for index, instance in enumerate(G.DEVICE_LIST): if dev.uuid == instance.uuid: G.LOGGING.warn("Device:%s updated %s -> %s" % (dev.uuid, instance, dev)) G.DEVICE_LIST[index] = dev break else: G.add_device(dev) return dev 其中所需的 import_device_cls 方法在 airtest.core.helper中:
def import_device_cls(platform): """lazy import device class""" platform = platform.lower() if platform in G.CUSTOM_DEVICES: cls = G.CUSTOM_DEVICES[platform] elif platform == "android": from airtest.core.android.android import Android as cls elif platform == "windows": from airtest.core.win.win import Windows as cls elif platform == "ios": from airtest.core.ios.ios import IOS as cls elif platform == "linux": from airtest.core.linux.linux import Linux as cls else: raise RuntimeError("Unknown platform: %s" % platform) return cls 很清楚的看到,在 auto_setup 中有层级的调用了connect_device进行设备连接初始化,在connect_device中调用import_device_cls添加设备,随后使新设备在G类中赋值给G.DEVICE,最后传给G.DEVICE_LIST。
在这里出现了 DEVICE_LIST 给对多设备操作的方式有了可能性,当然 Airtest Project 本就是这么一个解决方案。在文档中就有多机协作的介绍。以下文字引于文档。
在命令行运行脚本时,只需要将手机依次使用 –device Android:/// 添加到命令行中即可,例如:
>airtest run untitled.air --device Android:///serialno1 --device Android:///serialno2 --device Android:///serialno1 当然多设备并行的方案现在也有很多之后补充。
def touch(self, pos, duration=0.01): """ Perform touch event on the device Args: pos: coordinates (x, y) duration: how long to touch the screen Returns: None """ if self.touch_method == TOUCH_METHOD.MINITOUCH: pos = self._touch_point_by_orientation(pos) self.minitouch.touch(pos, duration=duration) elif self.touch_method == TOUCH_METHOD.MAXTOUCH: pos = self._touch_point_by_orientation(pos) self.maxtouch.touch(pos, duration=duration) else: self.adb.touch(pos) 以上就是简单的一个 touch 完成的所实现的过程。
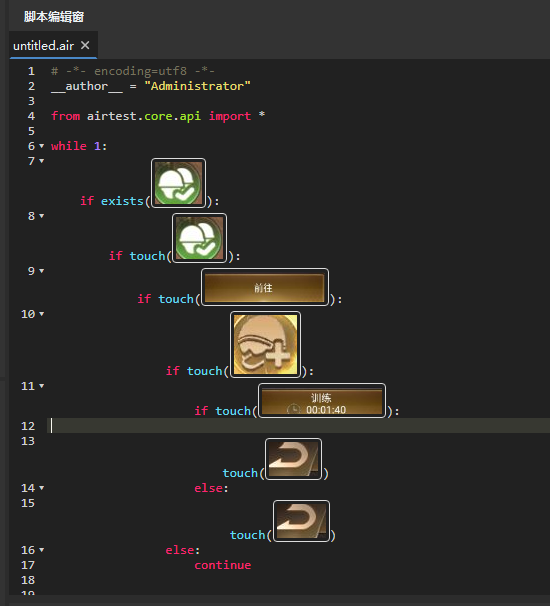
脚本再尝试
去代码查看是否改动
# -*- encoding=utf8 -*- __author__ = "Administrator" from airtest.core.api import * if exists(Template(r"tpl57.png", threshold=0.8, rgb=True, record_pos=(-0.213, 0.57), resolution=(540, 960))): touch(Template(r"tpl57.png", threshold=0.8, rgb=True, record_pos=(-0.213, 0.57), resolution=(540, 960))) # -*- encoding=utf8 -*- __author__ = "Administrator" from airtest.core.api import * if exists(Template(r"tpl57.png", threshold=0.8, rgb=True, record_pos=(-0.213, 0.57), resolution=(540, 960))): if touch(Template(r"tpl57.png", threshold=0.8, rgb=True, record_pos=(-0.213, 0.57), resolution=(540, 960))): if touch(Template(r"tpl97.png", record_pos=(0.004, 0.18), resolution=(540, 960))): if touch(Template(r"tpl26.png", rgb=True, record_pos=(0.174, 0.204), resolution=(540, 960))): if touch(Template(r"tpl85.png", threshold=0.8, rgb=True, record_pos=(0.222, 0.794), resolution=(540, 960))): sleep(1) @logwrap def exists(v): """ Check whether given target exists on device screen :param v: target to be checked :return: False if target is not found, otherwise returns the coordinates of the target :platforms: Android, Windows, iOS """ try: pos = loop_find(v, timeout=ST.FIND_TIMEOUT_TMP) except TargetNotFoundError: return False else: return pos @logwrap def loop_find(query, timeout=ST.FIND_TIMEOUT, threshold=None, interval=0.5, intervalfunc=None): """ Search for image template in the screen until timeout Args: query: image template to be found in screenshot timeout: time interval how long to look for the image template threshold: default is None interval: sleep interval before next attempt to find the image template intervalfunc: function that is executed after unsuccessful attempt to find the image template Raises: TargetNotFoundError: when image template is not found in screenshot Returns: TargetNotFoundError if image template not found, otherwise returns the position where the image template has been found in screenshot """ G.LOGGING.info("Try finding:\n%s", query) start_time = time.time() while True: screen = G.DEVICE.snapshot(filename=None, quality=ST.SNAPSHOT_QUALITY) if screen is None: G.LOGGING.warning("Screen is None, may be locked") else: if threshold: query.threshold = threshold match_pos = query.match_in(screen) if match_pos: try_log_screen(screen) return match_pos if intervalfunc is not None: intervalfunc() # 超时则raise,未超时则进行下次循环: if (time.time() - start_time) > timeout: try_log_screen(screen) raise TargetNotFoundError('Picture %s not found in screen' % query) else: time.sleep(interval) 在执行 loop_find 时首先给个计时器计时,获取屏幕后验证屏幕是否为None,为None可能没连接上;屏幕获取无异常则,使用截图对象调用 match_in 方法,成功进行匹配返回坐标值,否则返回False。
其中主要方法为 match_in ,match_in 也在 airtest.core.cv : 中,定义如下:
def match_in(self, screen): match_result = self._cv_match(screen) G.LOGGING.debug("match result: %s", match_result) if not match_result: return None focus_pos = TargetPos().getXY(match_result, self.target_pos) return focus_pos _cv_match 如下:
@logwrap def _cv_match(self, screen): # in case image file not exist in current directory: image = self._imread() image = self._resize_image(image, screen, ST.RESIZE_METHOD) ret = None for method in ST.CVSTRATEGY: # get function definition and execute: func = MATCHING_METHODS.get(method, None) if func is None: raise InvalidMatchingMethodError("Undefined method in CVSTRATEGY: '%s', try 'kaze'/'brisk'/'akaze'/'orb'/'surf'/'sift'/'brief' instead." % method) else: ret = self._try_match(func, image, screen, threshold=self.threshold, rgb=self.rgb) if ret: break return ret 其中在 match_in 中调用了 _cv_match,_cv_match 首先对图片 _imread() 进行CV2 处理,然后后面对图片进行压缩,应该是通过文档中所说的通过COSCOS的规则。然后根据一个策略遍历里面的算法进行计算,最后得到 ret 返回计算结果。(在深度就不会了,毕竟我不是搞测试的,点到为止)
# -*- encoding=utf8 -*- __author__ = "Administrator" from airtest.core.api import * if exists(Template(r"tpl57.png", threshold=0.8, rgb=True, record_pos=(-0.213, 0.57), resolution=(540, 960))): if touch(Template(r"tpl57.png", threshold=0.8, rgb=True, record_pos=(-0.213, 0.57), resolution=(540, 960))): if touch(Template(r"tpl97.png", record_pos=(0.004, 0.18), resolution=(540, 960))): if touch(Template(r"tpl26.png", threshold=0.75, rgb=True, record_pos=(0.174, 0.204), resolution=(540, 960))): if touch(Template(r"tpl85.png", threshold=0.7, rgb=False, record_pos=(0.222, 0.794), resolution=(540, 960))): touch(Template(r"tpl32.png", threshold=0.7, rgb=False, record_pos=(-0.441, -0.776), resolution=(540, 960))) else: touch(Template(r"tpl32.png", threshold=0.7, rgb=False, record_pos=(-0.441, -0.776), resolution=(540, 960))) 
结果发现在程序正常运行后,逻辑出现错误,运行结果如下:
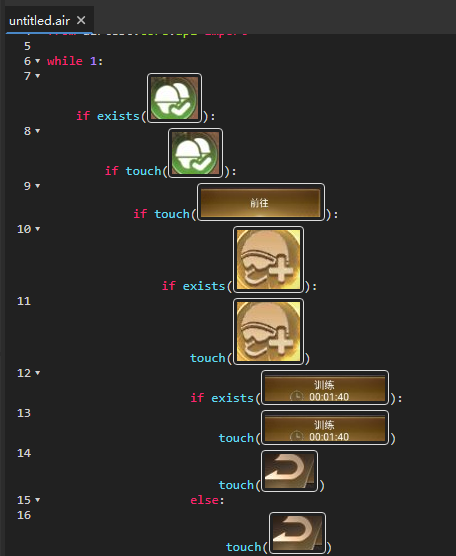
这时需要修改程序,把头盔的判断增加else分支,改为:
结果再次运行发现训练过后,第二次训练时间变成等待时间:
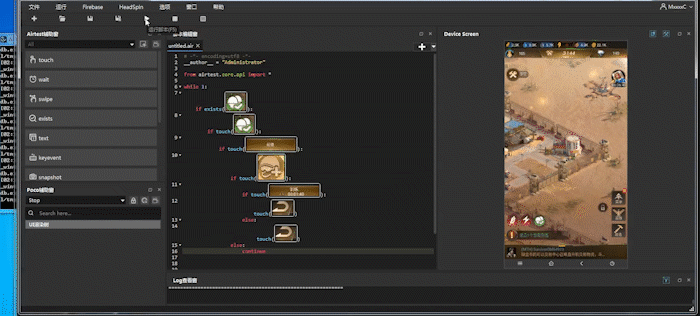
改为先判断后点击,头盔也是:
发布者:全栈程序员-站长,转载请注明出处:https://javaforall.net/204148.html原文链接:https://javaforall.net


