
Flume的学习和使用
本文是基于CentOS 7.3系统环境,进行Flume的学习和使用
- CentOS 7.3
一、Flume的简介
1.1 Flume基本概念
(1) 什么是Flume
Flume是Cloudera提供的一个高可用的,高可靠的,分布式的海量日志采集、聚合和传输的系统。
(2) Flume的目的
Flume最主要的作业就是,实时读取服务器本地磁盘的数据,将数据写入HDFS
1.2 Flume基本组件
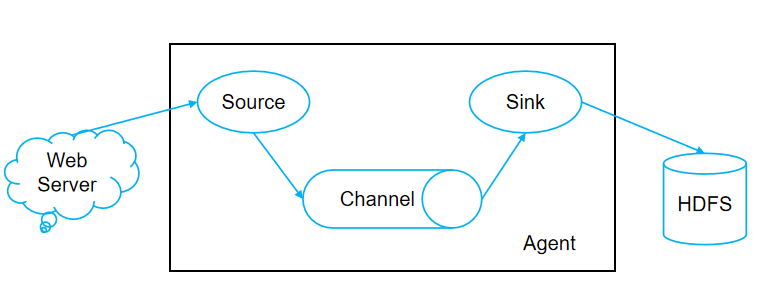

(0) Flume工作流程
Source采集数据并包装成Event,并将Event缓存在Channel中,Sink不断地从Channel获取Event,并解决成数据,最终将数据写入存储或索引系统
(1) Agent
(2) Source
Source是负责接收数据到Flume Agent的组件,采集数据并包装成Event。Source组件可以处理各种类型、各种格式的日志数据,包括avro、thrift、exec、jms、spooling directory、netcat、sequence generator、syslog、http、legacy
(3) Sink
(4) Channel
Channel是位于Source和Sink之间的缓冲区。因此,Channel允许Source和Sink运作在不同的速率上。Channel是线程安全的,可以同时处理几个Source的写入操作和几个Sink的读取操作
Flume自带两种Channel:Memory Channel和File Channel
- Memory Channel是内存中的队列。Memory Channel在不需要关心数据丢失的情景下适用。如果需要关心数据丢失,那么Memory Channel就不应该使用,因为程序死亡、机器宕机或者重启都会导致数据丢失
- File Channel将所有事件写到磁盘。因此在程序关闭或机器宕机的情况下不会丢失数据
(4) Event
二、Flume的安装和入门案例
2.1 Flume安装
(1) Flume压缩包解压
tar -xzvf apache-flume-1.7.0-bin.tar.gz -C /opt/module/ (2) 修改Flume名称
cd /opt/module/ mv apache-flume-1.7.0-bin flume (3) 修改Flume配置文件
cd /opt/module/flume/conf mv flume-env.sh.template flume-env.sh vi flume-env.sh # 修改内容如下 export JAVA_HOME=/opt/module/jdk1.8.0_201 cd /opt/module/flume/conf vi log4j.properties # 修改内容如下 flume.log.dir=/opt/module/flume/logs 2.1 Flume案例-监听数据端口
(1) 安装nc
yum install -y nc (2) 安装net-tools
yum install -y net-tools (3) 检测端口是否被占用
netstat -nltp | grep (4) 启动flume-agent
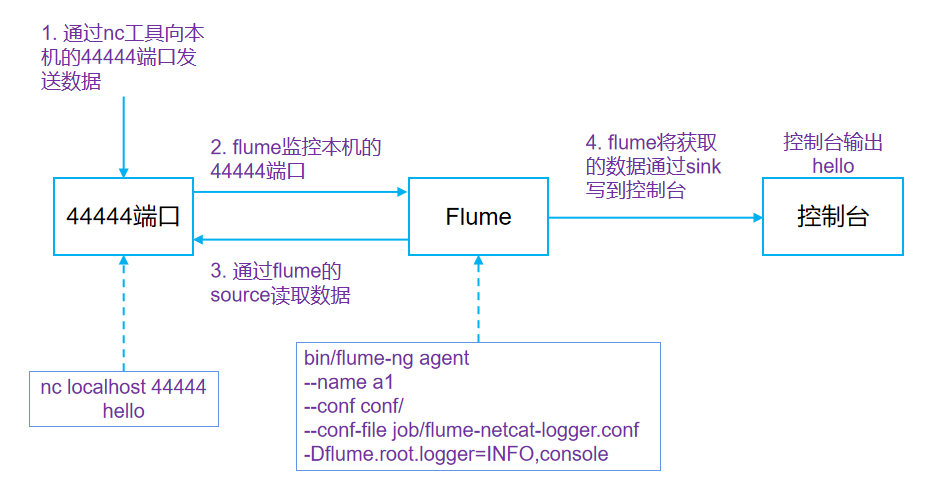
cd /opt/module/flume bin/flume-ng agent --name a1 --conf conf/ --conf-file job/flume-netcat-logger.conf -Dflume.root.logger=INFO,console (5) 开启另一个终端,发送消息
nc localhost 4444 aaa 2.2 Flume案例-实时监控单个追加文件

(1) 拷贝jar包至/opt/module/flume/lib
commons-configuration-1.6.jar hadoop-auth-2.7.2.jar hadoop-common-2.7.2.jar hadoop-hdfs-2.7.2.jar commons-io-2.4.jar htrace-core-3.1.0-incubating.jar (2) 创建flume-file-hdfs.conf文件
vi flume-file-hdfs.conf # Name the components on this agent a2.sources = r2 a2.sinks = k2 a2.channels = c2 # Describe/configure the source a2.sources.r2.type = exec a2.sources.r2.command = tail -F /opt/module/hive/logs/hive.log a2.sources.r2.shell = /bin/bash -c # Describe the sink a2.sinks.k2.type = hdfs a2.sinks.k2.hdfs.path = hdfs://hadoop102:9000/flume/%Y%m%d/%H #上传文件的前缀 a2.sinks.k2.hdfs.filePrefix = logs- #是否按照时间滚动文件夹 a2.sinks.k2.hdfs.round = true #多少时间单位创建一个新的文件夹 a2.sinks.k2.hdfs.roundValue = 1 #重新定义时间单位 a2.sinks.k2.hdfs.roundUnit = hour #是否使用本地时间戳 a2.sinks.k2.hdfs.useLocalTimeStamp = true #积攒多少个Event才flush到HDFS一次 a2.sinks.k2.hdfs.batchSize = 1000 #设置文件类型,可支持压缩 a2.sinks.k2.hdfs.fileType = DataStream #多久生成一个新的文件 a2.sinks.k2.hdfs.rollInterval = 60 #设置每个文件的滚动大小 a2.sinks.k2.hdfs.rollSize = #文件的滚动与Event数量无关 a2.sinks.k2.hdfs.rollCount = 0 # Use a channel which buffers events in memory a2.channels.c2.type = memory a2.channels.c2.capacity = 1000 a2.channels.c2.transactionCapacity = 100 # Bind the source and sink to the channel a2.sources.r2.channels = c2 a2.sinks.k2.channel = c2 (3) 启动flume-agent
bin/flume-ng agent -n a2 -c conf/ -f job/flume-file-hdfs.conf (4) 开启另一个终端,执行hive命令
hive 2.3 Flume案例-实时监控目录下多个新文件
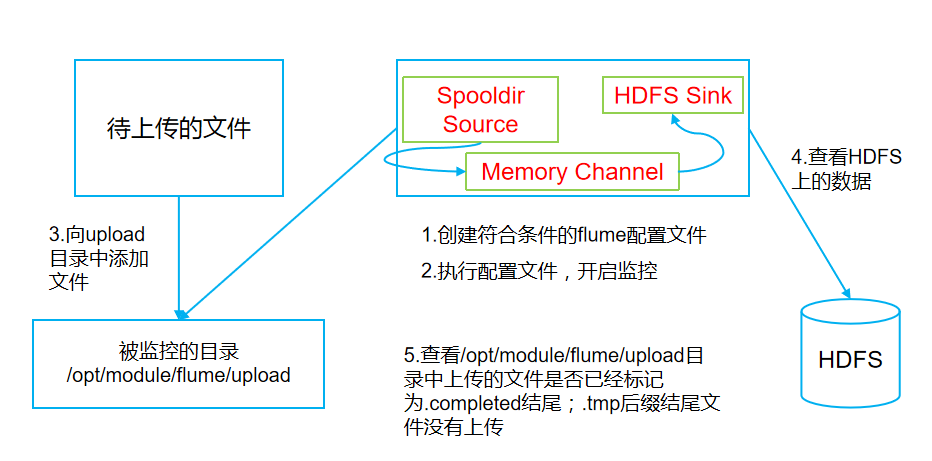
(1) 创建flume-dir-hdfs.conf文件
vim flume-dir-hdfs.conf # 添加如下内容 a3.sources = r3 a3.sinks = k3 a3.channels = c3 # Describe/configure the source a3.sources.r3.type = spooldir a3.sources.r3.spoolDir = /opt/module/flume/upload a3.sources.r3.fileSuffix = .COMPLETED a3.sources.r3.fileHeader = true #忽略所有以.tmp结尾的文件,不上传 a3.sources.r3.ignorePattern = ([^ ]*\.tmp) # Describe the sink a3.sinks.k3.type = hdfs a3.sinks.k3.hdfs.path = hdfs://hadoop102:9000/flume/upload/%Y%m%d/%H #上传文件的前缀 a3.sinks.k3.hdfs.filePrefix = upload- #是否按照时间滚动文件夹 a3.sinks.k3.hdfs.round = true #多少时间单位创建一个新的文件夹 a3.sinks.k3.hdfs.roundValue = 1 #重新定义时间单位 a3.sinks.k3.hdfs.roundUnit = hour #是否使用本地时间戳 a3.sinks.k3.hdfs.useLocalTimeStamp = true #积攒多少个Event才flush到HDFS一次 a3.sinks.k3.hdfs.batchSize = 100 #设置文件类型,可支持压缩 a3.sinks.k3.hdfs.fileType = DataStream #多久生成一个新的文件 a3.sinks.k3.hdfs.rollInterval = 60 #设置每个文件的滚动大小大概是128M a3.sinks.k3.hdfs.rollSize = #文件的滚动与Event数量无关 a3.sinks.k3.hdfs.rollCount = 0 # Use a channel which buffers events in memory a3.channels.c3.type = memory a3.channels.c3.capacity = 1000 a3.channels.c3.transactionCapacity = 100 # Bind the source and sink to the channel a3.sources.r3.channels = c3 a3.sinks.k3.channel = c3 (2) 启动flume-agent
bin/flume-ng agent -n a3 -c conf/ -f job/flume-dir-hdfs.conf (3) 开启另一个终端
cd /opt/module/flume/ mkdir upload cp NOTICE upload/ 2.4 Flume案例-实时监控目录下的多个追加文件
(1) 创建flume-dir-hdfs.conf文件
vi flume-taildir-hdfs.conf # 添加内容 a3.sources = r3 a3.sinks = k3 a3.channels = c3 # Describe/configure the source a3.sources.r3.type = TAILDIR a3.sources.r3.positionFile = /opt/module/flume/tail_dir.json a3.sources.r3.filegroups = f1 f2 a3.sources.r3.filegroups.f1 = /opt/module/flume/files/.*file.* a3.sources.r3.filegroups.f2 = /opt/module/flume/files/.*log.* # 不能写成如下的形式,后面的会覆盖前面的 # a3.sources.r3.filegroups.f1 = /opt/module/flume/files/file1.txt # a3.sources.r3.filegroups.f1 = /opt/module/flume/files/file2.txt # Describe the sink a3.sinks.k3.type = hdfs a3.sinks.k3.hdfs.path = hdfs://hadoop102:9000/flume/upload2/%Y%m%d/%H #上传文件的前缀 a3.sinks.k3.hdfs.filePrefix = upload- #是否按照时间滚动文件夹 a3.sinks.k3.hdfs.round = true #多少时间单位创建一个新的文件夹 a3.sinks.k3.hdfs.roundValue = 1 #重新定义时间单位 a3.sinks.k3.hdfs.roundUnit = hour #是否使用本地时间戳 a3.sinks.k3.hdfs.useLocalTimeStamp = true #积攒多少个Event才flush到HDFS一次 a3.sinks.k3.hdfs.batchSize = 100 #设置文件类型,可支持压缩 a3.sinks.k3.hdfs.fileType = DataStream #多久生成一个新的文件 a3.sinks.k3.hdfs.rollInterval = 60 #设置每个文件的滚动大小大概是128M a3.sinks.k3.hdfs.rollSize = #文件的滚动与Event数量无关 a3.sinks.k3.hdfs.rollCount = 0 # Use a channel which buffers events in memory a3.channels.c3.type = memory a3.channels.c3.capacity = 1000 a3.channels.c3.transactionCapacity = 100 # Bind the source and sink to the channel a3.sources.r3.channels = c3 a3.sinks.k3.channel = c3 (2) 创建目录和文件
cd /opt/module/flume mkdir files cp CHANGELOG files/CHANGELOG.log cp LICENSE files/LICENSE.log (3) 启动flume-agent
bin/flume-ng agent -n a3 -c conf/ -f job/flume-taildir-hdfs.conf (4) 开启另一个终端
cd /opt/module/flume/files vi CHANGELOG.log # 添加如下内容 xxxxx sssss wwwww 三、Flume的进阶
3.1 Flume事务

(1) Put事务流程
- doPut:将批数据先写入临时缓存区putList
- doCommit:检查channel内存队列是否足够合并
- doRollback:channel内存队列空间不足,回滚数据
(2) Take事务流程
- doTake:将数据取到临时缓存区takeList,并将数据发送到HDFS
- doCommit:如果数据全部发送成功,则清除临时缓冲区takeList
- doRollback:数据发送过程中如果出现异常,rollback将临时缓冲区takeList中的数据归还给channel内存队列
3.2 Flume Agent内部原理

(1) ChannelSelector
ChannelSelector的作用就是选出Event将要被发往哪个Channel,其共有两种类型
- Replicating(复制)
ReplicatingSelector会将同一个Event发往所有的Channel, - 和Multiplexing(多路复用)
Multiplexing会根据相应的原则,将不同的Event发往不同的Channel
(2) SinkProcessor
SinkProcessor共有三种类型
- DefaultSinkProcessor
对应单个sink,发送至单个sink - LoadBalancingSinkProcessor
LoadBalancingSinkProcessor对应的是Sink Group,LoadBalancingSinkProcessor可以实现负载均衡的功能 - FailoverSinkProcessor
FailoverSinkProcessor对应的是Sink Group,
FailoverSinkProcessor可以错误恢复的功能
四、Flume的拓扑结构
4.1 简单串联

这种模式是将多个flume顺序连接起来了,从最初的source开始到最终sink传送的目的存储系统。
- 优点
多个flume并联,可以增加event缓存数量 - 缺点
此模式不建议桥接过多的flume数量, flume数量过多不仅会影响传输速率,而且一旦传输过程中某个节点flume宕机,会影响整个传输系统。
4.2 复制和多路复用

Flume支持将事件流向一个或者多个目的地。这种模式可以将相同数据复制到多个channel中,或者将不同数据分发到不同的channel中,sink可以选择传送到不同的目的地。
4.3 负载均衡和故障转移

Flume支持使用将多个sink逻辑上分到一个sink组,sink组配合不同的SinkProcessor可以实现负载均衡和错误恢复的功能。
4.4 聚合

这种模式是我们最常见的,也非常实用,日常web应用通常分布在上百个服务器,大者甚至上千个、上万个服务器。产生的日志,处理起来也非常麻烦。用flume的这种组合方式能很好的解决这一问题,每台服务器部署一个flume采集日志,传送到一个集中收集日志的flume,再由此flume上传到hdfs、hive、hbase等,进行日志分析。
五、Flume的企业开发实例
5.1 复制和多路复用

(1) 创建flume-file-avro.conf文件
vi flume-file-avro.conf # Name the components on this agent a1.sources = r1 a1.sinks = k1 k2 a1.channels = c1 c2 # 将数据流复制给所有channel a1.sources.r1.selector.type = replicating # Describe/configure the source a1.sources.r1.type = exec a1.sources.r1.command = tail -F /opt/module/hive/logs/hive.log a1.sources.r1.shell = /bin/bash -c # Describe the sink # sink端的avro是一个数据发送者 a1.sinks.k1.type = avro a1.sinks.k1.hostname = hadoop1021 a1.sinks.k1.port = 4141 a1.sinks.k2.type = avro a1.sinks.k2.hostname = hadoop101 a1.sinks.k2.port = 4142 # Describe the channel a1.channels.c1.type = memory a1.channels.c1.capacity = 1000 a1.channels.c1.transactionCapacity = 100 a1.channels.c2.type = memory a1.channels.c2.capacity = 1000 a1.channels.c2.transactionCapacity = 100 # Bind the source and sink to the channel a1.sources.r1.channels = c1 c2 a1.sinks.k1.channel = c1 a1.sinks.k2.channel = c2 (2) 创建flume-avro-hdfs.conf文件
vi flume-avro-hdfs.conf # Name the components on this agent a2.sources = r1 a2.sinks = k1 a2.channels = c1 # Describe/configure the source # source端的avro是一个数据接收服务 a2.sources.r1.type = avro a2.sources.r1.bind = hadoop101 a2.sources.r1.port = 4141 # Describe the sink a2.sinks.k1.type = hdfs a2.sinks.k1.hdfs.path = hdfs://hadoop102:9000/flume2/%Y%m%d/%H #上传文件的前缀 a2.sinks.k1.hdfs.filePrefix = flume2- #是否按照时间滚动文件夹 a2.sinks.k1.hdfs.round = true #多少时间单位创建一个新的文件夹 a2.sinks.k1.hdfs.roundValue = 1 #重新定义时间单位 a2.sinks.k1.hdfs.roundUnit = hour #是否使用本地时间戳 a2.sinks.k1.hdfs.useLocalTimeStamp = true #积攒多少个Event才flush到HDFS一次 a2.sinks.k1.hdfs.batchSize = 100 #设置文件类型,可支持压缩 a2.sinks.k1.hdfs.fileType = DataStream #多久生成一个新的文件 a2.sinks.k1.hdfs.rollInterval = 600 #设置每个文件的滚动大小大概是128M a2.sinks.k1.hdfs.rollSize = #文件的滚动与Event数量无关 a2.sinks.k1.hdfs.rollCount = 0 # Describe the channel a2.channels.c1.type = memory a2.channels.c1.capacity = 1000 a2.channels.c1.transactionCapacity = 100 # Bind the source and sink to the channel a2.sources.r1.channels = c1 a2.sinks.k1.channel = c1 (3) 创建flume-avro-dir.conf文件
vi flume-avro-dir.conf # Name the components on this agent a3.sources = r1 a3.sinks = k1 a3.channels = c2 # Describe/configure the source a3.sources.r1.type = avro a3.sources.r1.bind = hadoop101 a3.sources.r1.port = 4142 # Describe the sink a3.sinks.k1.type = file_roll a3.sinks.k1.sink.directory = /opt/module/flume/data/flume3 # Describe the channel a3.channels.c2.type = memory a3.channels.c2.capacity = 1000 a3.channels.c2.transactionCapacity = 100 # Bind the source and sink to the channel a3.sources.r1.channels = c2 a3.sinks.k1.channel = c2 (4) 执行配置文件
bin/flume-ng agent -n a3 -c conf/ -f job/group1/flume-avro-dir.conf bin/flume-ng agent -n a2 -c conf/ -f job/group1/flume-avro-hdfs.conf bin/flume-ng agent -n a1 -c conf/ -f job/group1/flume-file-avro.conf (5) 启动Hadoop和Hive
sbin/start-dfs.sh sbin/start-yarn.sh bin/hive 5.2 故障转移

(1) 创建a1.conf文件
vi a1.conf # Name the components on this agent a1.sources = r1 a1.channels = c1 a1.sinks = k1 k2 # Describe/configure the source a1.sources.r1.type = netcat a1.sources.r1.bind = localhost a1.sources.r1.port = 44444 a1.sinkgroups = g1 a1.sinkgroups.g1.sinks = k1 k2 a1.sinkgroups.g1.processor.type = failover a1.sinkgroups.g1.processor.priority.k1 = 5 a1.sinkgroups.g1.processor.priority.k2 = 10 a1.sinkgroups.g1.processor.maxpenalty = 10000 # Describe the sink a1.sinks.k1.type = avro a1.sinks.k1.hostname = hadoop101 a1.sinks.k1.port = 4141 a1.sinks.k2.type = avro a1.sinks.k2.hostname = hadoop101 a1.sinks.k2.port = 4142 # Describe the channel a1.channels.c1.type = memory a1.channels.c1.capacity = 1000 a1.channels.c1.transactionCapacity = 100 # Bind the source and sink to the channel a1.sources.r1.channels = c1 a1.sinks.k1.channel = c1 a1.sinks.k2.channel = c1 (2) 创建a2.conf文件
vi a2.conf # Name the components on this agent a2.sources = r1 a2.sinks = k1 a2.channels = c1 # Describe/configure the source a2.sources.r1.type = avro a2.sources.r1.bind = hadoop101 a2.sources.r1.port = 4141 # Describe the sink a2.sinks.k1.type = logger # Describe the channel a2.channels.c1.type = memory a2.channels.c1.capacity = 1000 a2.channels.c1.transactionCapacity = 100 # Bind the source and sink to the channel a2.sources.r1.channels = c1 a2.sinks.k1.channel = c1 (3) 创建a3.conf文件
vi a3.conf # Name the components on this agent a3.sources = r1 a3.sinks = k1 a3.channels = c2 # Describe/configure the source a3.sources.r1.type = avro a3.sources.r1.bind = hadoop101 a3.sources.r1.port = 4142 # Describe the sink a3.sinks.k1.type = logger # Describe the channel a3.channels.c2.type = memory a3.channels.c2.capacity = 1000 a3.channels.c2.transactionCapacity = 100 # Bind the source and sink to the channel a3.sources.r1.channels = c2 a3.sinks.k1.channel = c2 (4) 执行配置文件
bin/flume-ng agent -n a3 -c conf/ -f job/group2/a3.conf -Dflume.root.logger=INFO,console bin/flume-ng agent -n a2 -c conf/ -f job/group2/a2.conf -Dflume.root.logger=INFO,console bin/flume-ng agent -n a1 -c conf/ -f job/group2/a1.conf (5) 开启另一个终端,发送消息
nc localhost 4444 aaa (6) 杀死a3后,通过故障转移,a2能正常工作
kill -9 a3-pid 5.3 负载均衡

(1) 创建a1.conf文件
vi a1.conf # Name the components on this agent a1.sources = r1 a1.channels = c1 a1.sinks = k1 k2 # Describe/configure the source a1.sources.r1.type = netcat a1.sources.r1.bind = localhost a1.sources.r1.port = 44444 a1.sinkgroups = g1 a1.sinkgroups.g1.sinks = k1 k2 a1.sinkgroups.g1.processor.type = load_balance a1.sinkgroups.g1.processor.backoff = true a1.sinkgroups.g1.processor.selector = random # Describe the sink a1.sinks.k1.type = avro a1.sinks.k1.hostname = hadoop101 a1.sinks.k1.port = 4141 a1.sinks.k2.type = avro a1.sinks.k2.hostname = hadoop101 a1.sinks.k2.port = 4142 # Describe the channel a1.channels.c1.type = memory a1.channels.c1.capacity = 1000 a1.channels.c1.transactionCapacity = 100 # Bind the source and sink to the channel a1.sources.r1.channels = c1 a1.sinks.k1.channel = c1 a1.sinks.k2.channel = c1 (2) 创建a2.conf文件
vi a2.conf # Name the components on this agent a2.sources = r1 a2.sinks = k1 a2.channels = c1 # Describe/configure the source a2.sources.r1.type = avro a2.sources.r1.bind = hadoop101 a2.sources.r1.port = 4141 # Describe the sink a2.sinks.k1.type = logger # Describe the channel a2.channels.c1.type = memory a2.channels.c1.capacity = 1000 a2.channels.c1.transactionCapacity = 100 # Bind the source and sink to the channel a2.sources.r1.channels = c1 a2.sinks.k1.channel = c1 (3) 创建a3.conf文件
vi a3.conf # Name the components on this agent a3.sources = r1 a3.sinks = k1 a3.channels = c2 # Describe/configure the source a3.sources.r1.type = avro a3.sources.r1.bind = hadoop101 a3.sources.r1.port = 4142 # Describe the sink a3.sinks.k1.type = logger # Describe the channel a3.channels.c2.type = memory a3.channels.c2.capacity = 1000 a3.channels.c2.transactionCapacity = 100 # Bind the source and sink to the channel a3.sources.r1.channels = c2 a3.sinks.k1.channel = c2 (4) 执行配置文件
bin/flume-ng agent -n a3 -c conf/ -f job/group2/a3.conf -Dflume.root.logger=INFO,console bin/flume-ng agent -n a2 -c conf/ -f job/group2/a2.conf -Dflume.root.logger=INFO,console bin/flume-ng agent -n a1 -c conf/ -f job/group2/a1.conf (5) 开启另一个终端,不断发送消息
nc localhost 4444 aaa 5.4 聚合

(1) 创建a1.conf文件
vi a1.conf # Name the components on this agent a1.sources = r1 a1.sinks = k1 a1.channels = c1 # Describe/configure the source a1.sources.r1.type = exec a1.sources.r1.command = tail -F /opt/module/flume/group.log a1.sources.r1.shell = /bin/bash -c # Describe the sink a1.sinks.k1.type = avro a1.sinks.k1.hostname = hadoop103 a1.sinks.k1.port = 4141 # Describe the channel a1.channels.c1.type = memory a1.channels.c1.capacity = 1000 a1.channels.c1.transactionCapacity = 100 # Bind the source and sink to the channel a1.sources.r1.channels = c1 a1.sinks.k1.channel = c1 (2) 创建a2.conf文件
vi a2.conf # Name the components on this agent a2.sources = r1 a2.sinks = k1 a2.channels = c1 # Describe/configure the source a2.sources.r1.type = netcat a2.sources.r1.bind = hadoop102 a2.sources.r1.port = 44444 # Describe the sink a2.sinks.k1.type = avro a2.sinks.k1.hostname = hadoop103 a2.sinks.k1.port = 4141 # Use a channel which buffers events in memory a2.channels.c1.type = memory a2.channels.c1.capacity = 1000 a2.channels.c1.transactionCapacity = 100 # Bind the source and sink to the channel a2.sources.r1.channels = c1 a2.sinks.k1.channel = c1 (3) 创建a3.conf文件
vi a3.conf # Name the components on this agent a3.sources = r1 a3.sinks = k1 a3.channels = c1 # Describe/configure the source a3.sources.r1.type = avro a3.sources.r1.bind = hadoop103 a3.sources.r1.port = 4141 # Describe the sink # Describe the sink a3.sinks.k1.type = logger # Describe the channel a3.channels.c1.type = memory a3.channels.c1.capacity = 1000 a3.channels.c1.transactionCapacity = 100 # Bind the source and sink to the channel a3.sources.r1.channels = c1 a3.sinks.k1.channel = c1 (4) 执行配置文件
- hadoop103
bin/flume-ng agent --conf conf/ --name a3 --conf-file job/group4/a3.conf -Dflume.root.logger=INFO,console - hadoop102
bin/flume-ng agent --conf conf/ --name a2 --conf-file job/group4/a2.conf - hadoop101
bin/flume-ng agent --conf conf/ --name a1 --conf-file job/group4/a1.conf (5) 开启另一个终端,不断发送消息
- hadoop101
nc hadoop102 44444 aaa (6) 向group.log文件中,添加内容
- hadoop101
cd /opt/module/flume echo 222 >> group.log 5.5 自定义Interceptor案例
根据日志不同的类型(type),将日志进行分流,分入到不同的sink
(1) 实现一个Interceptor接口
package com.inspur.flume.interceptor; import org.apache.flume.Context; import org.apache.flume.Event; import org.apache.flume.interceptor.Interceptor; import java.util.List; import java.util.Map; public class MyInterceptor implements Interceptor {
     public void initialize() {
     } public Event intercept(Event event) {
     Map<String, String> headers = event.getHeaders(); byte[] body = event.getBody(); if (body[0] <= '9' && body[0] >= '0') {
     headers.put("type", "number"); } else {
     headers.put("type", "not_number"); } return event; } public List<Event> intercept(List<Event> events) {
     for (Event event : events) {
     intercept(event); } return events; } public void close() {
     } public static class MyBuilder implements Interceptor.Builder{
     public Interceptor build() {
     return new MyInterceptor(); } public void configure(Context context) {
     } } }
(2) hadoop101创建配置文件a1.conf
- hadoop101
cd /opt/module/flume/job/interceptor vi a1.conf # Name the components on this agent a1.sources = r1 a1.sinks = k1 k2 a1.channels = c1 c2 # Describe/configure the source a1.sources.r1.type = netcat a1.sources.r1.bind = localhost a1.sources.r1.port = 44444 a1.sources.r1.interceptors = i1 a1.sources.r1.interceptors.i1.type = com.inspur.flume.interceptor.MyInterceptor$MyBuilder a1.sources.r1.selector.type = multiplexing a1.sources.r1.selector.header = type a1.sources.r1.selector.mapping.not_number = c1 a1.sources.r1.selector.mapping.number = c2 # Describe the sink a1.sinks.k1.type = avro a1.sinks.k1.hostname = hadoop102 a1.sinks.k1.port = 4141 a1.sinks.k2.type=avro a1.sinks.k2.hostname = hadoop103 a1.sinks.k2.port = 4242 # Use a channel which buffers events in memory a1.channels.c1.type = memory a1.channels.c1.capacity = 1000 a1.channels.c1.transactionCapacity = 100 # Use a channel which buffers events in memory a1.channels.c2.type = memory a1.channels.c2.capacity = 1000 a1.channels.c2.transactionCapacity = 100 # Bind the source and sink to the channel a1.sources.r1.channels = c1 c2 a1.sinks.k1.channel = c1 a1.sinks.k2.channel = c2 (3) hadoop102创建配置文件a1.conf
- hadoop102
cd /opt/module/flume/job/interceptor vi a1.conf # Name the components on this agent a1.sources = r1 a1.sinks = k1 a1.channels = c1 a1.sources.r1.type = avro a1.sources.r1.bind = hadoop102 a1.sources.r1.port = 4141 a1.sinks.k1.type = logger a1.channels.c1.type = memory a1.channels.c1.capacity = 1000 a1.channels.c1.transactionCapacity = 100 a1.sinks.k1.channel = c1 a1.sources.r1.channels = c1 (4) hadoop103创建配置文件a1.conf
- hadoop103
cd /opt/module/flume/job/interceptor vi a1.conf # Name the components on this agent a1.sources = r1 a1.sinks = k1 a1.channels = c1 a1.sources.r1.type = avro a1.sources.r1.bind = hadoop103 a1.sources.r1.port = 4242 a1.sinks.k1.type = logger a1.channels.c1.type = memory a1.channels.c1.capacity = 1000 a1.channels.c1.transactionCapacity = 100 a1.sinks.k1.channel = c1 a1.sources.r1.channels = c1 (5) 分别启动flume进程
- hadoop103
bin/flume-ng agent -n a1 -c conf/ -f job/interceptor/a1.conf -Dflume.root.logger=INFO,console - hadoop102
bin/flume-ng agent -n a1 -c conf/ -f job/interceptor/a1.conf -Dflume.root.logger=INFO,console - hadoop101
bin/flume-ng agent -n a1 -c conf/ -f job/interceptor/a1.conf -Dflume.root.logger=INFO,console (6) 开启另一个终端,不断发送消息
- hadoop101
nc hadoop102 44444 aaa 111 1ss s11 5.6 自定义Source案例
(1) 实现一个Source类
package com.inspur.flume.source; import org.apache.flume.Context; import org.apache.flume.Event; import org.apache.flume.EventDeliveryException; import org.apache.flume.PollableSource; import org.apache.flume.conf.Configurable; import org.apache.flume.event.SimpleEvent; import org.apache.flume.source.AbstractSource; import java.util.HashMap; public class MySource extends AbstractSource implements Configurable, PollableSource {
     private String prefix; private long interval; public Status process() throws EventDeliveryException {
     Status status = null; try {
     for (int i = 1; i <= 5; i++) {
     Event e = new SimpleEvent(); e.setHeaders(new HashMap<String, String>()); e.setBody((prefix + i).getBytes()); getChannelProcessor().processEvent(e); Thread.sleep(interval); } status = Status.READY; } catch (InterruptedException e) {
     status = Status.BACKOFF; } return status; } public long getBackOffSleepIncrement() {
     return 2000; } public long getMaxBackOffSleepInterval() {
     return 20000; } public void configure(Context context) {
     prefix = context.getString("source.prefix","Log"); interval = context.getLong("source.interval",1000L); } }
(2) hadoop101创建配置文件a1.conf
- hadoop101
cd /opt/module/flume/job/source vi a1.conf # Name the components on this agent a1.sources = r1 a1.sinks = k1 a1.channels = c1 # Describe/configure the source a1.sources.r1.type = com.inspur.flume.source.MySource a1.sources.r1.source.prefix= Log a1.sources.r1.source.interval= 1000 # Describe the sink a1.sinks.k1.type = logger # Use a channel which buffers events in memory a1.channels.c1.type = memory a1.channels.c1.capacity = 1000 a1.channels.c1.transactionCapacity = 100 # Bind the source and sink to the channel a1.sources.r1.channels = c1 a1.sinks.k1.channel = c1 (3) 启动flume进程
- hadoop101
bin/flume-ng agent -n a1 -c conf/ -f job/source/a1.conf -Dflume.root.logger=INFO,console 5.7 自定义文件Source案例二
(1) 实现一个Source类,接收MQTT服务器
- 引入org.eclipse.paho.client.mqttv3.* 类包
- 自定义一个Source类
- 自定义一个SimpleMqttClient类
该类用于配置MQTT服务器的链接(IP地址、端口号、用户名、密码、主题)、订阅主题消息、订阅消息的回调 - 接收到回调函数的消息,进行event的封装,然后发送
(2) 实现一个Source类,接收传感器串口数据
- 自定义一个Source类
- 自定义一个串口类
该类用于配置串口类的链接(串口号、波特率、校验位、数据位、停止位)、数据的回调(数据都是以十六进制进行传递) - 接收到回调函数的消息,进行event的封装,然后发送
5.8 自定义Sink案例
(1) 实现一个Sink类
package com.inspur.flume.sink; import org.apache.flume.*; import org.apache.flume.conf.Configurable; import org.apache.flume.sink.AbstractSink; public class MySink extends AbstractSink implements Configurable {
     private long interval; private String prefix; private String suffix; public Status process() throws EventDeliveryException {
     Status status = null; Channel channel = this.getChannel(); Transaction transaction = channel.getTransaction(); transaction.begin(); try {
     Event event = null; while ((event = channel.take()) == null) {
     Thread.sleep(interval); } byte[] body = event.getBody(); String line = new String(body, "UTF-8"); System.out.println(prefix + line + suffix); status = Status.READY; transaction.commit(); } catch (Exception e) {
     transaction.rollback(); status = Status.BACKOFF; } finally {
     transaction.close(); } return status; } public void configure(Context context) {
     prefix = context.getString("source.prefix", "start:"); suffix = context.getString("source.suffix", ":end"); interval = context.getLong("source.interval", 1000L); } }
(2) hadoop101创建配置文件a1.conf
- hadoop101
# Name the components on this agent a1.sources = r1 a1.sinks = k1 a1.channels = c1 # Describe/configure the source a1.sources.r1.type = netcat a1.sources.r1.bind = localhost a1.sources.r1.port = 44444 # Describe the sink a1.sinks.k1.type = com.inspur.flume.sink.MySink a1.sinks.k1.source.prefix = xuzheng: a1.sinks.k1.source.suffix = :xuzheng a1.sinks.k1.source.interval = 1000 # Use a channel which buffers events in memory a1.channels.c1.type = memory a1.channels.c1.capacity = 1000 a1.channels.c1.transactionCapacity = 100 # Bind the source and sink to the channel a1.sources.r1.channels = c1 a1.sinks.k1.channel = c1 (3) 启动flume进程
- hadoop101
bin/flume-ng agent -n a1 -c conf/ -f job/sink/a1.conf -Dflume.root.logger=INFO,console 六、Flume数据流监控
6.1 Flume自带监控工具
执行如下的命令,并访问 http://IP:1234
bin/flume-ng agent -n a1 -c conf/ -f job/sink/a1.conf -Dflume.monitoring.type=http -Dflume.monitoring.port=1234 6.2 Ganglia
Ganglia由gmond、gmetad和gweb三部分组成
- gmond(Ganglia Monitoring Daemon)
gmond是一种轻量级服务,安装在每台需要收集指标数据的节点主机上。使用gmond,你可以很容易收集很多系统指标数据,如CPU、内存、磁盘、网络和活跃进程的数据等
- gmetad(Ganglia Meta Daemon)
gmetad整合所有信息,并将其以RRD格式存储至磁盘的服务
- gweb(Ganglia Web)
Ganglia可视化工具,gweb是一种利用浏览器显示gmetad所存储数据的PHP前端。在Web界面中以图表方式展现集群的运行状态下收集的多种不同指标数据
6.3 Ganglia监控视图
| 监控视图名称 | 描述 |
|---|---|
| EventPutAttemptCount | source尝试写入channel的事件总数量 |
| EventPutSuccessCount | 成功写入channel且提交的事件总数量 |
| EventTakeAttemptCount | sink尝试从channel拉取事件的总数量 |
| EventTakeSuccessCount | sink成功读取的事件的总数量 |
| StartTime | channel启动的时间(毫秒) |
| StopTime | channel停止的时间(毫秒) |
| ChannelSize | 目前channel中事件的总数量 |
| ChannelFillPercentage | channel占用百分比 |
| ChannelCapacity | channel的容量 |
发布者:全栈程序员-站长,转载请注明出处:https://javaforall.net/211843.html原文链接:https://javaforall.net


