
一、版本差异
Spring Boot 2.2.0 版本开始引入 JUnit 5 作为单元测试默认库,在 Spring Boot 2.2.0 版本之前,spring-boot-starter-test 包含了 JUnit 4 的依赖,Spring Boot 2.2.0 版本之后替换成了 Junit Jupiter。
- pom.xml
 <dependency> <groupId>org.springframework.boot
     groupId> <artifactId>spring-boot-starter-test
      artifactId> <scope>test
       scope>
        dependency>
- JUnit 5: Java单元测试框架
- Spring Test & Spring Boot Test: Spring Boot的测试工具和支持
- AssertJ: 流式断言
- Hamcrest: Hamcrest断言
- Mockito: Java Mock框架
- JSONassert: JSON断言
- JsonPath: XPath for JSON
二、SpringBootTest和Junit5的使用
整体上,Spring Boot Test支持的测试种类,大致可以分为如下三类:
- 单元测试:
一般面向方法,编写一般业务代码时,测试成本较大。涉及到的注解有@Test。- 切片测试:一般面向难于测试的边界功能,介于单元测试和功能测试之间。涉及到的注解有 @WebMvcTest等。
主要就是对于Controller的测试,分离了Service层,这里就涉及到Moc控制层所依赖的组件了- 功能测试:一般
面向某个完整的业务功能,同时也可以使用切面测试中的mock能力,推荐使用。涉及到的注解有@SpringBootTest等。
- 单元测试
集成测试,不启动server,以创建项目后自动生成的默认测试类为例:
@SpringBootTest class TestDemoApplicationTests {
    @Test void contextLoads() {
} } 默认无参数的@SpringBootTest 注解会加载一个Web Application Context并提供Mock Web Environment,但是不会启动内置的server。这点从日志中没有打印Tomcat started on port(s)可以佐证。
- 集成测试,启动server
新建一个测试类如下:
//指定@SpringBootTest的Web Environment为RANDOM_PORT //此时,将会加载Applicaiton Context,并启动server,server侦听在随机端口上。在测试类中通过@LocalServerPort获取该端口值。 @SpringBootTest(webEnvironment = SpringBootTest.WebEnvironment.RANDOM_PORT) public class DemoTest {
    @LocalServerPort private Integer port; @Test @DisplayName("should access application") void shouldAccessApplication() {
    assertThat(port).isGreaterThan(1024); } }
也可以通过指定@SpringBootTest的Web Environment为DEFINED_PORT 来指定server侦听应用程序配置的端口,默认为8080。不过这种指定端口的方式很少使用,因为如果本地同时启动应用时,会导致端口冲突。
- 更多关系JUnit5集成SpringBootTest的例子,参考这个文档,我这里不在啰嗦
三、Spring Boot Test中的主要注解
- 在说Mockito之前,先看一下SpringBootTest的注解,
Mockito是一个独立的框架,被springboot集成了而已。
从功能上讲,Spring Boot Test中的注解主要分如下几类
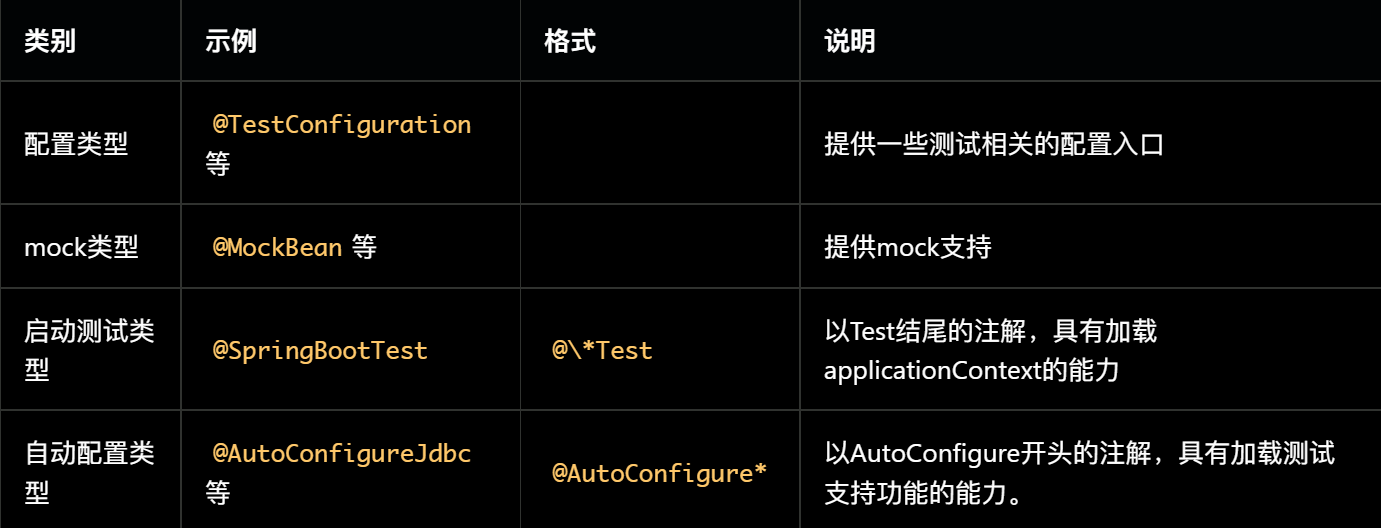

- 配置类型的注解:

使用@SpringBootApplication启动测试或者生产代码,被@TestComponent描述的Bean会自动被排除掉。如果不是则需要向@SpringBootApplication添加TypeExcludeFilter。
- mock类型的注解
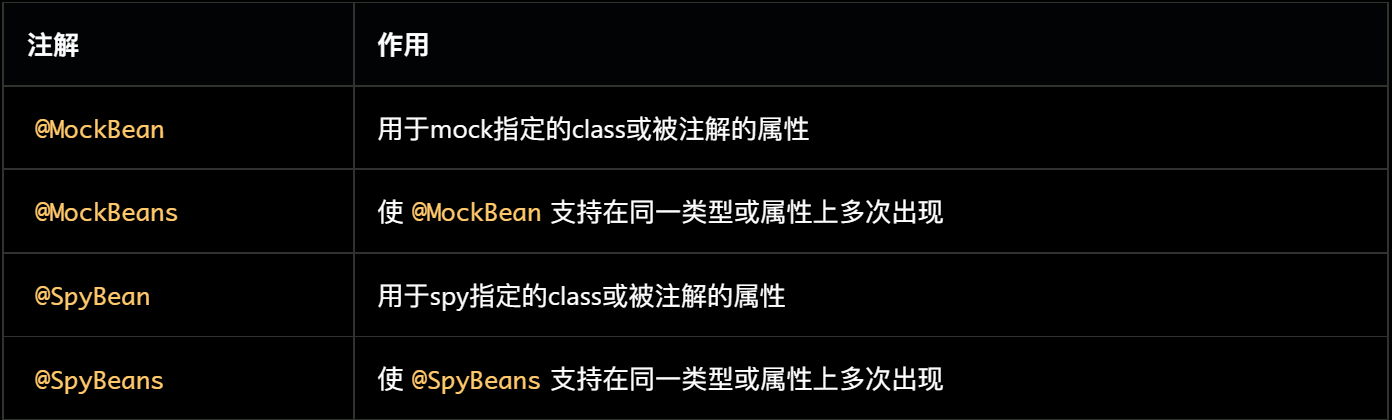
@MockBean和@SpyBean这两个注解,在mockito框架中本来已经存在,且功能基本相同。Spring Boot Test又定义一份重复的注解,目的在于使MockBean和SpyBean被ApplicationContext管理,从而方便使用。
MockBean和SpyBean功能非常相似,都能模拟方法的各种行为。不同之处在于MockBean是全新的对象,跟正式对象没有关系;
而SpyBean与正式对象紧密联系,可以模拟正式对象的部分方法,没有被模拟的方法仍然可以运行正式代码。
- 自动配置类型的注解(@AutoConfigure*)
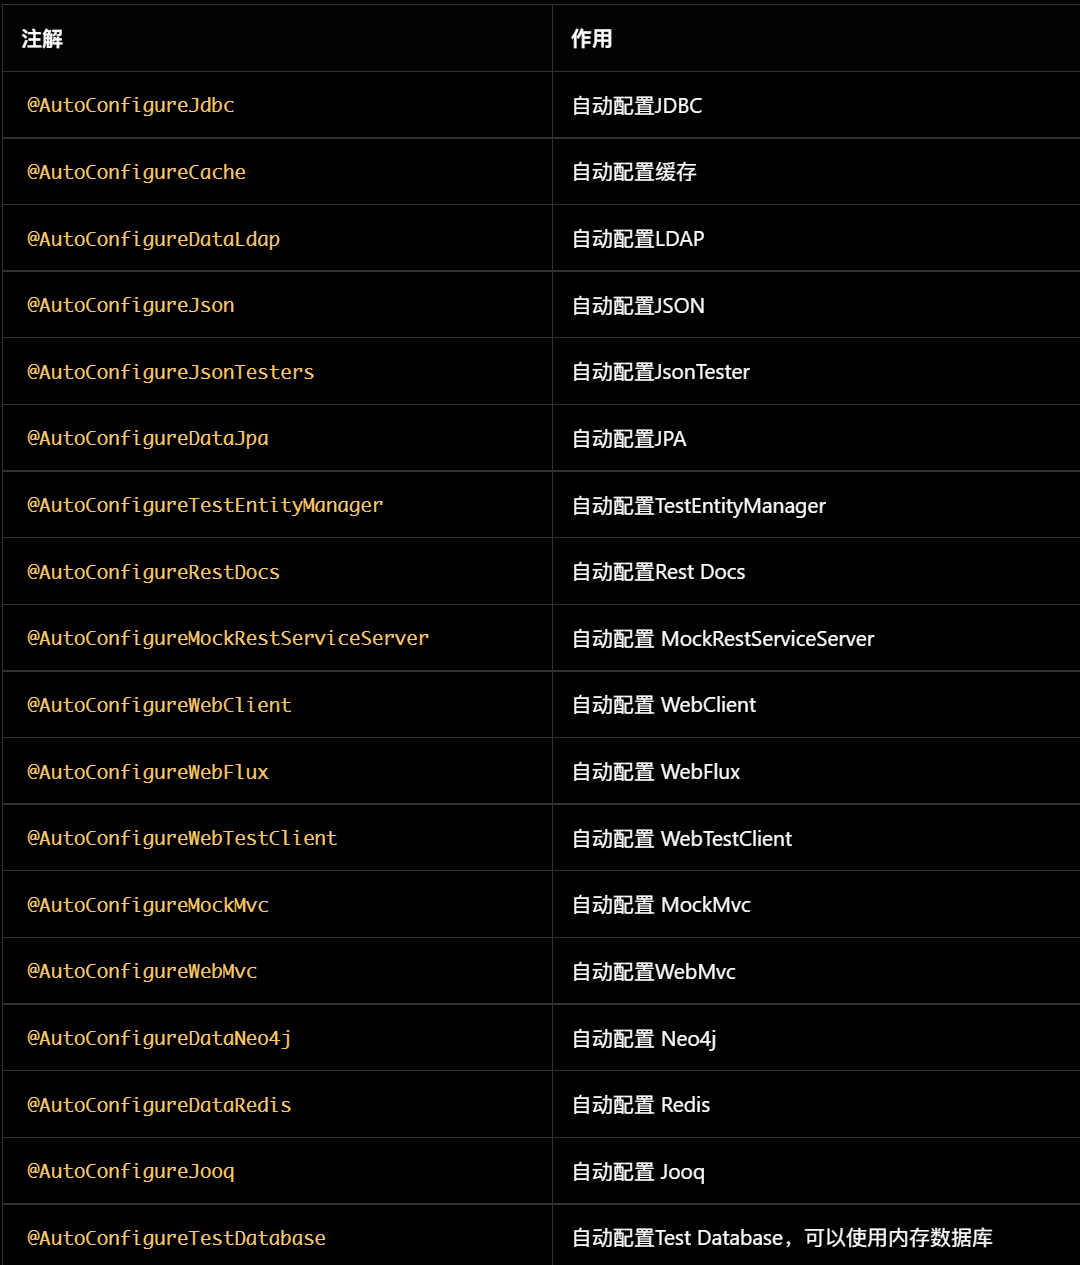
这些注解可以搭配@\*Test使用,用于开启在@\*Test中未自动配置的功能。例如@SpringBootTest和@AutoConfigureMockMvc组合后,就可以注入org.springframework.test.web.servlet.MockMvc。
“自动配置类型”有两种使用方式:
- 在功能测试(即使用@SpringBootTest)时显示添加。
一般在切片测试中被隐式使用,例如@WebMvcTest注解时,隐式添加了@AutoConfigureCache、@AutoConfigureWebMvc、@AutoConfigureMockMvc。
- 启动测试类型的注解
所有的@*Test注解都被@BootstrapWith注解,它们可以启动ApplicationContext,是测试的入口,所有的测试类必须声明一个@*Test注解。
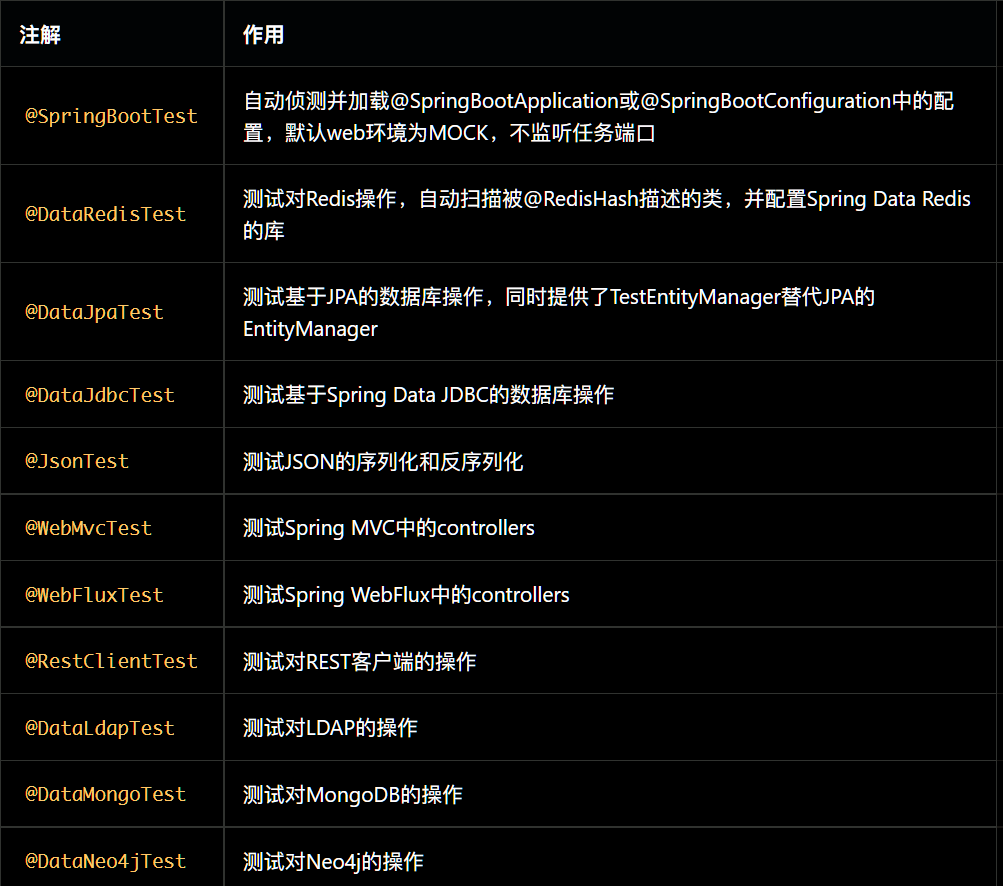
除了@SpringBootTest之外的注解都是用来进行切面测试的,他们会默认导入一些自动配置,点击官方docs查看详情。一般情况下,推荐使用@SpringBootTest而非其它切片测试的注解,简单有效。若某次改动仅涉及特定切片,可以考虑使用切片测试。SpringBootTest是这些注解中最常用的一个,其中包含的配置项如下:
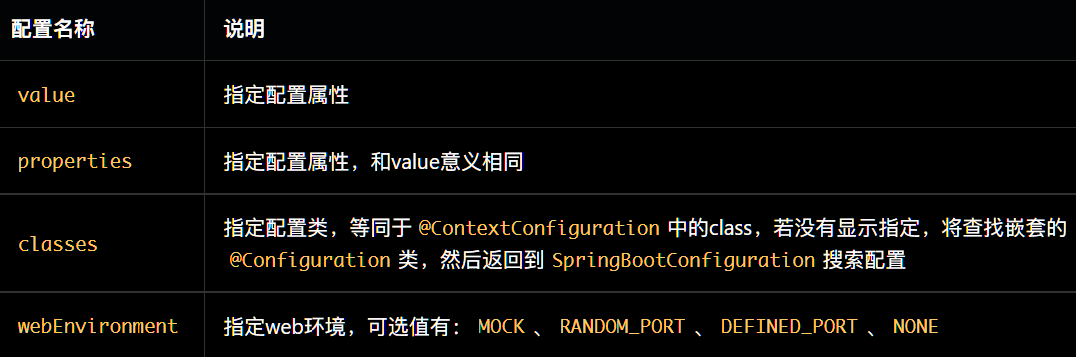
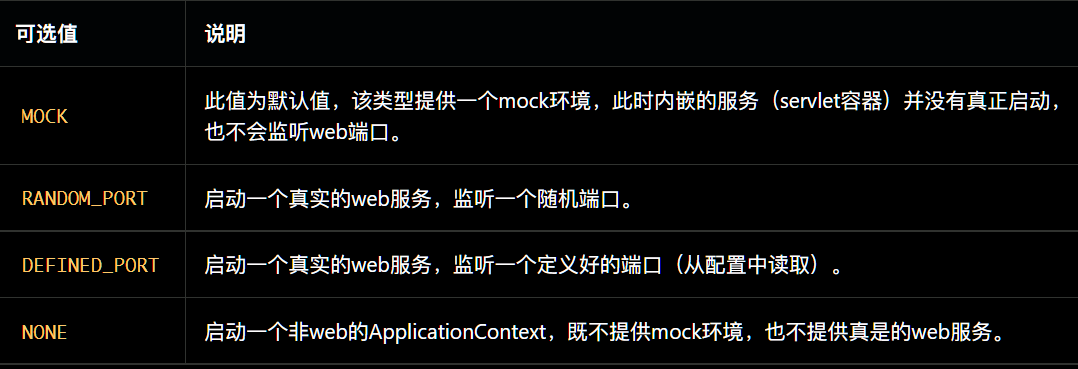
webEnvironment详细说明:
- 相似注解的区别和联系
@TestComment vs @Comment:
@TestComponent是另一种@Component,在语义上用来指定某个Bean是专门用于测试的。使用@SpringBootApplication服务时,@TestComponent会被自动排除@TestConfiguration vs @Configuration:
@TestConfiguration是Spring Boot Boot Test提供的,@Configuration是Spring Framework提供的。@TestConfiguration实际上是也是一种@TestComponent,只是这个@TestComponent专门用来做配置用。
@TestConfiguration和@Configuration不同,它不会阻止@SpringBootTest的查找机制,相当于是对既有配置的补充或覆盖。@SpringBootTest vs @WebMvcTest(或@*Test):
都可以启动Spring的ApplicationContext @SpringBootTest自动侦测并加载@SpringBootApplication或@SpringBootConfiguration中的配置,@WebMvcTest不侦测配置,只是默认加载一些自动配置。
@SpringBootTest测试范围一般比@WebMvcTest大。@MockBean vs @SpyBean:
都能模拟方法的各种行为。不同之处在于MockBean是全新的对象,跟正式对象没有关系;而SpyBean与正式对象紧密联系,可以模拟正式对象的部分方法,没有被模拟的方法仍然可以运行正式代码
参考文章
四、Mockito的使用
- 简单的一个例子
public class MyMockitoTest {
    private static UserServiceImpl mockUserService; private static List<String> mockedList; @BeforeAll public static void beforeMock() throws Exception {
    //使用Mock,模拟UserServiceImpl对象 mockUserService = mock(UserServiceImpl.class); // mock creation 创建mock对象 mockedList = mock(List.class); /* * 默认情况下,所有的函数都有返回值。mock函数默认返回的是null, * 一个空的集合或者一个被对象类型包装的内置类型, * 例如0、false对应的对象类型为Integer、Boolean */ //做一些测试桩(stubbing),也即是定义行为,如果是getOneUser(3),则返回的是null,2则抛出异常 when(mockUserService.getOneUser(1)).thenReturn(new User("a",1)); //注意该抛出异常的stubbing,一定是UserServiceImpl真的有抛出这个异常,Mockito才能编译通过,并执行 when(mockUserService.getOneUser(2)).thenThrow(new IllegalAccessException()); when(mockUserService.getOneUser(3)).thenReturn(new User("a",1)); when(mockUserService.update(isA(User.class))).thenReturn(true); } @Test @DisplayName("GetOneUser") public void testGet() throws Exception {
    //使用mock模拟出来的mockUserService进行操作 User user = mockUserService.getOneUser(1); User oneUser = mockUserService.getOneUser(2); User oneUser1 = mockUserService.getOneUser(3); System.out.println(user); System.out.println(oneUser); mockUserService.update(user); //验证是否执行过一次getOneUser(1) verify(mockUserService, times(1)).getOneUser(eq(1)); //验证是否执行过一次update verify(mockUserService, times(1)).update(isA(User.class)); } @Test public void testMatcher(){
    //使用内置的anyInt()参数匹配器,也可以使用自定义的参数处理器 when(mockedList.get(anyInt())).thenReturn("element"); System.out.println(mockedList.get(999)); } //验证函数的确切、最少、从未调用次数 @Test @DisplayName("testUsingTime") public void testUsingTime(){
//using mock mockedList.add("once"); mockedList.add("twice"); mockedList.add("twice"); mockedList.add("three times"); mockedList.add("three times"); mockedList.add("three times"); // 下面的两个验证函数效果一样,因为verify默认验证的就是times(1) // verify函数默认验证的是执行了times(1),也就是某个测试函数是否执行了1次.因此,times(1)通常被省略了。 verify(mockedList).add("once"); verify(mockedList, times(1)).add("once"); // 验证具体执行次数 verify(mockedList, times(2)).add("twice"); verify(mockedList, times(3)).add("three times"); // 使用never()进行验证,never相当于times(0) verify(mockedList, never()).add("never happened"); // 使用atLeast()/atMost() verify(mockedList, atLeastOnce()).add("three times"); verify(mockedList, atLeast(2)).add("five times"); verify(mockedList, atMost(5)).add("three times"); } } - 主要看一下使用mockito进行切面测试(Controller)
public class Keywords implements Serializable {
    private Integer id; private String keyword; private String notes; public Keywords(){
   } @Override public String toString() {
    return "Keywords{" + "id=" + id + ", keyword='" + keyword + '\'' + ", notes='" + notes + '\'' + '}'; } public Integer getId() {
    return id; } public String getKeyword() {
    return keyword; } public String getNotes() {
    return notes; } private Keywords(Builder builder){
    this.id=builder.id; this.keyword = builder.keyword; this.notes = builder.notes; } public static class Builder{
    private Integer id; private String keyword; private String notes; public Builder setId(Integer id) {
    this.id = id; return this; } public Builder setKeyword(String keyword) {
    this.keyword = keyword; return this; } public Builder setNotes(String notes) {
    this.notes = notes; return this; } public Keywords build(){
    return new Keywords(this); } } }
@Controller public class KeywordController {
@Autowired private KeywordsService keywordsService; @Autowired private KeywordsServiceImpl keywordsServiceImpl; @GetMapping(value = "/api/keywords") public Keywords findKeywordById(@RequestParam(value = "id") Integer id) {
return keywordsService.findKeywordById(id); } @PostMapping("/api/add") @ResponseBody public Boolean addOne(@RequestBody Keywords keywords){
//调用被spy注解的类的方法,就会直接使用真实的方法 return keywordsServiceImpl.addOne(keywords); } } @Repository public interface KeywordsService {
Keywords findKeywordById(int i); Boolean addOne(Keywords keywords); } @Service public class KeywordsServiceImpl implements KeywordsService {
@Override public Keywords findKeywordById(int i) {
return null; } @Override public Boolean addOne(Keywords keywords) {
System.out.println("invoke spy class method"); System.out.println(keywords); return false; } } public class MvcMockitoTest {
//mockito 会将 @Mock、@Spy 修饰的对象自动注入到 @InjectMocks 修饰的对象中 //定义MockMvc对象 protected MockMvc mockMvc; @Mock //要mock被测类中依赖的对象使用@Mock注解 private KeywordsService keywordsService; @Spy //被 spy 的对象,调用其方法时默认会走真实方法。 private KeywordsServiceImpl keywordsServiceImpl; @InjectMocks //被测类本身使用@InjectMocks注解 private KeywordController controller; @BeforeEach() public void setup() {
MockitoAnnotations.openMocks(this); //初始化MockMvc对象,将KeywordController加载进Spring容器 mockMvc = MockMvcBuilders.standaloneSetup(controller).build(); } @Test @DisplayName("findKeywordByIdTest") public void findKeywordByIdTest() throws Exception {
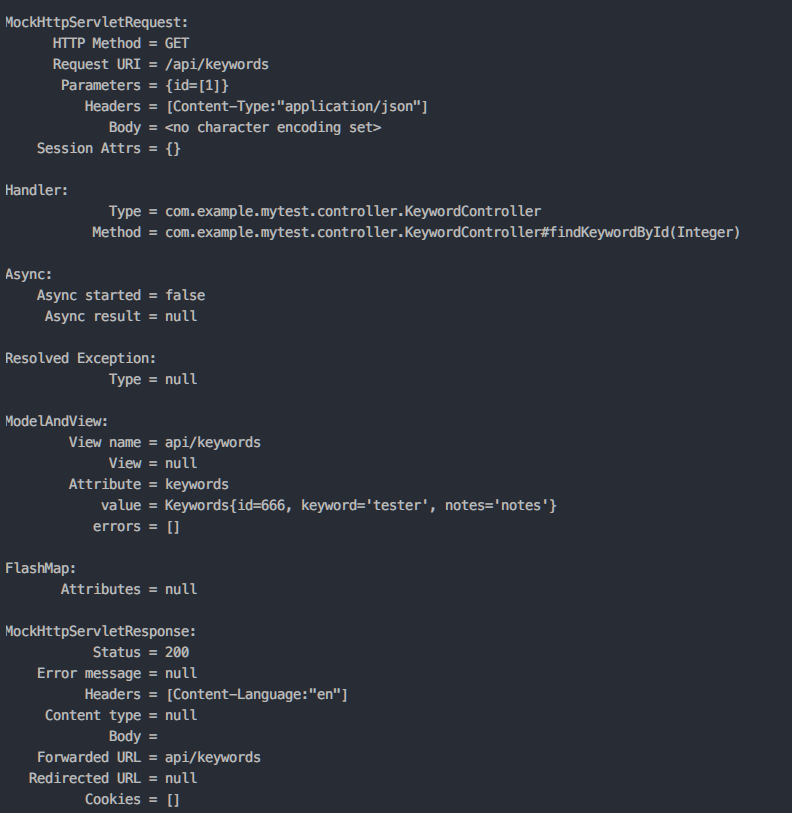
Keywords keywords = new Builder().setId(666).setKeyword("tester").setNotes("notes").build(); //打桩,当执行findKeywordById(1)时,就返回上面创建的keywords对象 Mockito.when(keywordsService.findKeywordById(1)).thenReturn(keywords); //执行一个RequestBuider请求,自动执行SpringMvc的流程并映射到相应的控制器执行处理 MvcResult mvcResult = mockMvc.perform( MockMvcRequestBuilders.get("/api/keywords?id=1") //请求的url,请求的方法是Get .contentType(MediaType.APPLICATION_JSON)) //数据的格式 //添加ResultMatcher验证规则,验证perform执行完成后的结果是否正确(对返回的数据进行判断) .andExpect(status().isOk()) //期待的返回状态是200 //添加ResultHandler结果处理器,比如调试打印结果到控制台print() .andDo(print())//打印出请求和相应的内容 //最后返回相应的MvcResult,然后进行自定义验证/进行下一步的异步处理 .andReturn(); System.out.println(mvcResult.getResponse().getContentAsString()); } @Test @DisplayName("addOne") public void testAddOne() throws Exception {
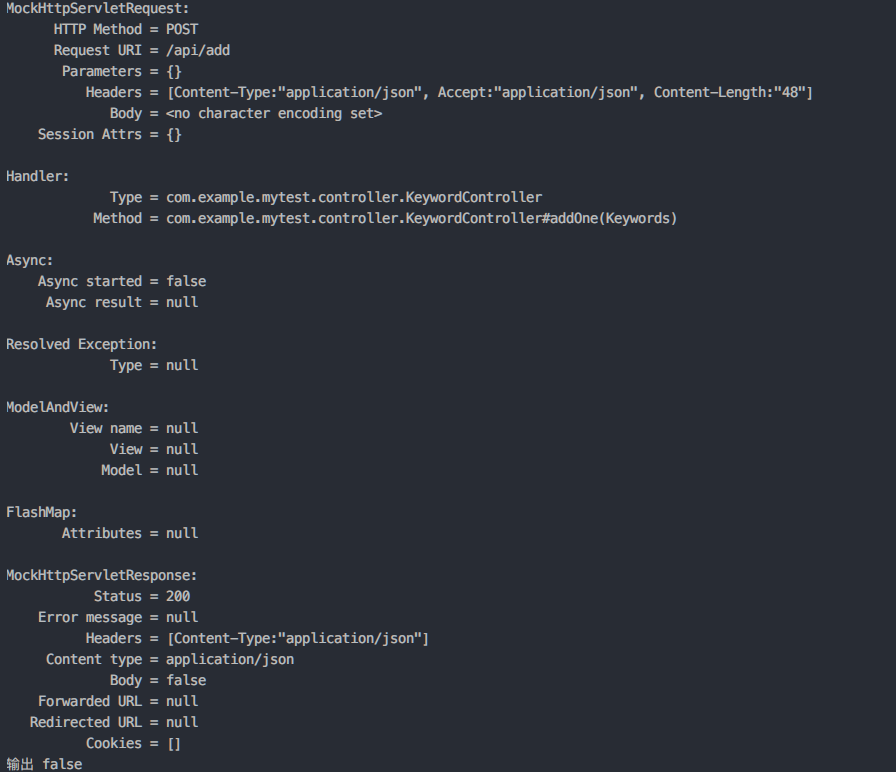
Keywords build = new Builder().setId(1).setKeyword("addOne").setNotes("testAddOne").build(); Gson gson = new Gson(); String jsonString =gson.toJson(build); System.out.println(jsonString); MvcResult mvcResult = mockMvc.perform( MockMvcRequestBuilders.post("/api/add") .contentType(MediaType.APPLICATION_JSON)//发送的文本格式 .content(jsonString) .accept(MediaType.APPLICATION_JSON)//接受的文本格式 ) .andExpect(MockMvcResultMatchers.status().isOk()) .andDo(MockMvcResultHandlers.print()).andReturn(); int status = mvcResult.getResponse().getStatus(); assertEquals(status,200); System.out.println("输出 " + mvcResult.getResponse().getContentAsString()); } } 结果:

mockito可以配合junit5的断言功能使用。更多用法可以参考官方文档
发布者:全栈程序员-站长,转载请注明出处:https://javaforall.net/227960.html原文链接:https://javaforall.net


