
一:Pacemaker和corosync概述:
Pacemaker(心脏起搏器),是一个集群管理资源器。但是其不提供心跳信息。pacemaker是一个延续的CRM。Pacemaker到了V3的版本以后
拆分了多个项目,其中pacemaker就是拆分出来的资源管理器。
Heart 3.0拆分之后的组成部分:
*Heartbeat:将原来的消息通信层独立为heartbeat项目,新的heartbeat只负责维护集群各个节点的信息以及他们之间的通信。
*Cluster Glue:相当于一个中间层,它用来将Heartbeat和pacemaker关联起来,主要包含2个部分,即:LRM和STONITH
*Resource Agent:用来控制服务启停,监控服务状态的脚本集合,这些脚本将被LRM调用从而实现各种资源启动,停止,监控等。
*pacemaker:也就是Cluster Resource Manager(简称CRM),用来管理整个HA的控制中心,客户端通过pacemaker来配置管理监控
整个集群。
Pacemaker特点:
&主机和应用程序级别的故障检测和恢复。
&几乎支持任何冗余设置
&同时支持多种集群配置模式
&配置策略处理法定人数损失
&支持应用启动和关机顺序
&支持多种模式的应用程序(如主/从)
&可以测试任何故障或集群的状态
集群组件说明:
*stonith:心跳系统
*LRMD:本地资源管理守护进程。它提供了一个通用的接口支持的资源类型。直接调用资源代理
*pengine:政策引擎。根据当前状态和配置集群计算的下一个状态。产生一个过渡图。包含行动和
依赖关系的列表。
*CIB:集群信息库。包含所有集群选项,节点,资源,他们彼此之间的关系和现状的定义,同步更新到
所有集群节点。 CIB使用XML表示集群的集群中的所有资源的配置和当前状态。CIB的内容会被自动在整个集群中同步
*CRMD:集群资源管理守护进程。主要是消息代理的PENGINE和LRM,还选举一个领导者(DC)统筹活动的集群。
*OPENAIS:OpenAIS的消息和成员层。
*Heartbe:心跳消息层。OpenAIS的一种替代。
*CCM:共识集群成员
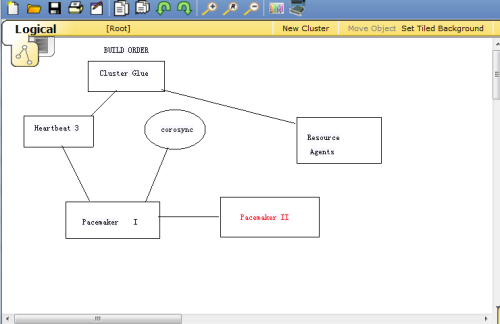
Corosync最初只是用来演示OpenAIS集群框架接口规范的一个应用,可以实现HA心跳信息传输功能,RHCS集群套件就是基于corosync
实现。corosync只提供了message layer(即实现Heartbeat+CCM),没有直接提供CRM,一般使用Pacemaker进行资源管理。
Pacemaker是一个开源的高可用资源管理器(CRM),位于HA架构中资源管理,资源代理(RA)这个层次,它不能提供底层心跳信息传递的功能。
要想与对方节点通信需要借助底层的心跳传递服务器,将信息通告给对方。
Corosync主要就是实现集群中Message layer层的功能:完成集群心跳及事务信息的传递,Pacemaker主要实现的是管理集群中的资源(CRM),真正
启用,停止集群中的服务是RA(资源代理)这个子组件。RA的类别有下面几种类型LSB:位于/etc/rc.d/init.d/目录下。至少支持start,stop
restart,status,reload,force-reload等命令。
OCF:/usr/lib/ocf/resource.d/provider/,类似于LSB脚本,但支持start stop status monitor,meta-data;
STONITH:调用stonith设备的功能
systemd:unit file, /usr/lib/systemd/system/这类服务必须设置成开机自启动(enable)。
service:调用用户的自定义脚本
二:部署Pacemaker+corosync
2.1安装软件包
pacemaker依赖corosync,安装pacemaker包会连带安装corosync包;yum -y install pacemaker
[root@node2 ~]# yum -y install pacemaker;ssh root@node1 ‘yum -y install pacemaker‘
[root@node2 ~]# rpm -ql corosync
/etc/corosync
/etc/corosync/corosync.conf.example #配置文件模板
/etc/corosync/corosync.conf.example.udpu
/etc/corosync/service.d
/etc/corosync/uidgid.d
/etc/dbus-1/system.d/corosync-signals.conf
/etc/rc.d/init.d/corosync #服务脚本
/etc/rc.d/init.d/corosync-notifyd
/etc/sysconfig/corosync-notifyd
/usr/bin/corosync-blackbox
/usr/libexec/lcrso
/usr/libexec/lcrso/coroparse.lcrso
…
/usr/sbin/corosync
/usr/sbin/corosync-cfgtool
/usr/sbin/corosync-cpgtool
/usr/sbin/corosync-fplay
/usr/sbin/corosync-keygen #生成节点间通信时用到的认证密钥文件,默认从/dev/random读随机数
/usr/sbin/corosync-notifyd
/usr/sbin/corosync-objctl
/usr/sbin/corosync-pload
/usr/sbin/corosync-quorumtool
/usr/share/doc/corosync-1.4.7
…
/var/lib/corosync
/var/log/cluster #日志文件目录
2.2◆安装crmsh
RHEL自6.4起不再提供集群的命令行配置工具crmsh,默认提供的是pcs;本例中使用crmsh,crmsh依赖于pssh,因此需要一并下载安装
[root@node2 ~]# yum -y install pssh-2.3.1-2.el6.x86_64.rpm crmsh-1.2.6-4.el6.x86_64.rpm
…
Installed:
crmsh.x86_64 0:1.2.6-4.el6 pssh.x86_64 0:2.3.1-2.el6
Dependency Installed:
python-dateutil.noarch 0:1.4.1-6.el6 redhat-rpm-config.noarch 0:9.0.3-44.el6.centos
Complete!
2.3◆配置corosync
cd /etc/corosync/
cp corosync.conf.example corosync.conf
vim corosync.conf,在其中加入:
service { #以插件化方式调用pacemaker
ver: 0
name: pacemaker
# use_mgmtd: yes
}
[root@node2 ~]# cd /etc/corosync/
[root@node2 corosync]# cp corosync.conf.example corosync.conf
[root@node2 corosync]# vim corosync.conf
# Please read the corosync.conf.5 manual page
compatibility: whitetank
totem {
version: 2
secauth: on #是否进行消息认证;若启用,使用corosync-keygen生成密钥文件
threads: 0
interface {
ringnumber: 0
bindnetaddr: 192.168.30.0 #接口绑定的网络地址
mcastaddr: 239.255.10.1 #传递心跳信息所使用的组播地址
mcastport: 5405
ttl: 1
}
}
logging {
fileline: off
to_stderr: no
to_logfile: yes
logfile: /var/log/cluster/corosync.log #日志路径
to_syslog: no
debug: off
timestamp: on #是否记录时间戳;当日志量很大时关闭该项可提高性能
logger_subsys {
subsys: AMF
debug: off
}
}
#下面这段表示以插件的方式调用pacemaker
service {
ver: 0
name: pacemaker
# use_mgmtd: yes
}
2.4◆启动corosync
service corosync start
查看corosync引擎是否正常启动,是否正常读取配置文件:
grep -e “Corosync Cluster Engine” -e “configuration file” /var/log/cluster/corosync.log
查看初始化成员节点通知是否正常发出:
grep TOTEM /var/log/cluster/corosync.log
检查启动过程中是否有错误产生:
grep ERROR: /var/log/cluster/corosync.log | grep -v unpack_resources
查看pacemaker是否正常启动:
grep pcmk_startup /var/log/cluster/corosync.log
[root@node2 ~]# service corosync start;ssh root@node1 ‘service corosync start‘
Starting Corosync Cluster Engine (corosync): [ OK ]
Starting Corosync Cluster Engine (corosync): [ OK ]
[root@node2 ~]# grep -e “Corosync Cluster Engine” -e “configuration file” /var/log/cluster/corosync.log
Apr 28 02:03:08 corosync [MAIN ] Corosync Cluster Engine (‘1.4.7‘): started and ready to provide service.
Apr 28 02:03:08 corosync [MAIN ] Successfully read main configuration file ‘/etc/corosync/corosync.conf‘.
[root@node2 ~]# grep TOTEM /var/log/cluster/corosync.log
Apr 28 02:03:08 corosync [TOTEM ] Initializing transport (UDP/IP Multicast).
Apr 28 02:03:08 corosync [TOTEM ] Initializing transmit/receive security: libtomcrypt SOBER128/SHA1HMAC (mode 0).
Apr 28 02:03:08 corosync [TOTEM ] The network interface [192.168.30.20] is now up.
Apr 28 02:03:08 corosync [TOTEM ] A processor joined or left the membership and a new membership was formed.
Apr 28 02:03:11 corosync [TOTEM ] A processor joined or left the membership and a new membership was formed.
Apr 28 02:04:10 corosync [TOTEM ] A processor joined or left the membership and a new membership was formed.
[root@node2 ~]# grep ERROR: /var/log/cluster/corosync.log | grep -v unpack_resources #以下错误提示可忽略
Apr 28 02:03:08 corosync [pcmk ] ERROR: process_ais_conf: You have configured a cluster using the Pacemaker plugin for Corosync. The plugin is not supported in this environment and will be removed very soon.
Apr 28 02:03:08 corosync [pcmk ] ERROR: process_ais_conf: Please see Chapter 8 of ‘Clusters from Scratch‘ (http://www.clusterlabs.org/doc) for details on using Pacemaker with CMAN
Apr 28 02:03:13 corosync [pcmk ] ERROR: pcmk_wait_dispatch: Child process cib terminated with signal 11 (pid=7953, core=true)
…
[root@node2 ~]# grep pcmk_startup /var/log/cluster/corosync.log
Apr 28 02:03:08 corosync [pcmk ] info: pcmk_startup: CRM: Initialized
Apr 28 02:03:08 corosync [pcmk ] Logging: Initialized pcmk_startup
Apr 28 02:03:08 corosync [pcmk ] info: pcmk_startup: Maximum core file size is:
Apr 28 02:03:08 corosync [pcmk ] info: pcmk_startup: Service: 9
Apr 28 02:03:08 corosync [pcmk ] info: pcmk_startup: Local hostname: node2
◆配置接口crmsh的启动命令是crm,其使用方式有两种:
命令行模式,例如 # crm ra list ocf
交互式模式,例如:
# crm
crm(live)# ra
crm(live)ra# list ocf
或者:
# crm
crm(live)# ra list ocf
help:查看帮助信息
end/cd:切回上一级
exit/quit:退出程序
常用子命令:
①status: 查看集群状态
②resource:
start, stop, restart
promote/demote:提升/降级一个主从资源
cleanup:清理资源状态
migrate:将资源迁移到另外一个节点上
③configure:
primitive, group, clone, ms/master(主从资源)
具体用法可使用help命令查看,如crm(live)configure# help primitive
示例:
primitive webstore ocf:Filesystem params device=172.16.100.6:/web/htdocs directory=/var/www/html fstype=nfs op monitor interval=20s timeout=30s
group webservice webip webserver
location, collocation, order
示例:
colocation webserver_with_webip inf: webserver webip
order webip_before_webserver mandatory: webip webserver #mandatory也可换成inf
location webip_on_node2 webip rule inf: #uname eq node2
或location webip_on_node2 webip inf: node2
monitor #pacemaker具有监控资源的功能
monitor <rsc>[:<role>] <interval>[:<timeout>]
例如:monitor webip 30s:20s
very:CIB语法验证
commit:将更改后的信息提交写入CIB(集群信息库)
注意:配置完后要记得very和commit
show:显示CIB对象
edit:直接以vim模式编辑CIB对象
refresh:重新读取CIB信息
delete:删除CIB对象
erase:擦除所有配置
④node:
standby:让节点离线,强制其成为备节点
online:让节点重新上线
fence:隔离节点
clearstate:清理节点状态信息
delete:删除一个节点
⑤ra:
classes:查看资源代理有哪些种类
有四种:lsb, ocf, service, stonith
list <class> [<provider>]:列出资源代理
例如:
list ocf #列出ocf类型的资源代理
list ocf linbit #列出ocf类型中,由linbit提供的资源代理
meta/info [<class>:[<provider>:]]<type> #查看一个资源代理的元数据,主要是查看其可用参数
例如:info ocf:linbit:drbd
或 info ocf:drbd
或 info drbd
providers <type> [<class>]:显示指定资源代理的提供者
例如:providers apache
crm(live)# help #查看有哪些子命令或获取帮助信息
This is crm shell, a Pacemaker command line interface.
Available commands:
cib manage shadow CIBs
resource resources management #资源管理
configure CRM cluster configuration #集群配置
node nodes management #节点管理
options user preferences
history CRM cluster history
site Geo-cluster support
ra resource agents information center #资源代理信息
status show cluster status #显示集群状态
help,? show help (help topics for list of topics)
end,cd,up go back one level
quit,bye,exit exit the program #退出
crm(live)# status #查看集群状态
Last updated: Fri Apr 29 00:19:36 2016
Last change: Thu Apr 28 22:41:38 2016
Stack: classic openais (with plugin)
Current DC: node2 – partition with quorum
Version: 1.1.11-97629de
2 Nodes configured, 2 expected votes
0 Resources configured
Online: [ node1 node2 ]
crm(live)# configure
crm(live)configure# help
…
Commands for resources are: #可配置的资源类型
– `primitive`
– `monitor`
– `group`
– `clone`
– `ms`/`master` (master-slave)
In order to streamline large configurations, it is possible to
define a template which can later be referenced in primitives:
– `rsc_template`
In that case the primitive inherits all attributes defined in the
template.
There are three types of constraints: #可定义的约束
– `location`
– `colocation`
– `order`
…
crm(live)configure# help primitive #查看使用帮助
…
Usage:
……………
primitive <rsc> {[<class>:[<provider>:]]<type>|@<template>}
[params attr_list]
[meta attr_list]
[utilization attr_list]
[operations id_spec]
[op op_type [<attribute>=<value>…] …]
attr_list :: [$id=<id>] <attr>=<val> [<attr>=<val>…] | $id-ref=<id>
id_spec :: $id=<id> | $id-ref=<id>
op_type :: start | stop | monitor
……………
Example:
……………
primitive apcfence stonith:apcsmart \
params ttydev=/dev/ttyS0 hostlist=”node1 node2″ \
op start timeout=60s \
op monitor interval=30m timeout=60s
crm(live)configure# cd #使用cd或end命令切回上一级
crm(live)# ra
crm(live)ra# help
This level contains commands which show various information about
the installed resource agents. It is available both at the top
level and at the `configure` level.
Available commands:
classes list classes and providers
list list RA for a class (and provider)
meta show meta data for a RA
providers show providers for a RA and a class
help show help (help topics for list of topics)
end go back one level
quit exit the program
crm(live)ra# classes
lsb
ocf / heartbeat linbit pacemaker
service
stonith
crm(live)ra# help list
List available resource agents for the given class. If the class
is `ocf`, supply a provider to get agents which are available
only from that provider.
Usage:
……………
list <class> [<provider>]
……………
Example:
……………
list ocf pacemaker
……………
crm(live)ra# list ocf
CTDB ClusterMon Delay Dummy Filesystem
…
…
crm(live)ra# list ocf linbit
drbd
crm(live)ra# help meta
Show the meta-data of a resource agent type. This is where users
can find information on how to use a resource agent. It is also
possible to get information from some programs: `pengine`,
`crmd`, `cib`, and `stonithd`. Just specify the program name
instead of an RA.
Usage:
……………
info [<class>:[<provider>:]]<type>
info <type> <class> [<provider>] (obsolete)
……………
Example:
……………
info apache
info ocf:pacemaker:Dummy
info stonith:ipmilan
info pengine
……………
crm(live)ra# info ocf:linbit:drbd
…
Operations‘ defaults (advisory minimum):
start timeout=240
promote timeout=90
demote timeout=90
notify timeout=90
stop timeout=100
monitor_Slave timeout=20 interval=20
monitor_Master timeout=20 interval=10
crm(live)ra# cd
crm(live)# resource
crm(live)resource# help
At this level resources may be managed.
All (or almost all) commands are implemented with the CRM tools
such as `crm_resource(8)`.
Available commands:
status show status of resources
start start a resource
stop stop a resource
restart restart a resource
promote promote a master-slave resource
demote demote a master-slave resource
…
crm(live)resource# help cleanup
Cleanup resource status. Typically done after the resource has
temporarily failed. If a node is omitted, cleanup on all nodes.
If there are many nodes, the command may take a while.
Usage:
……………
cleanup <rsc> [<node>]
……………
⊙在使用crmsh配置集群时曾遇到过如下错误:
ERROR: CIB not supported: validator ‘pacemaker-2.0‘, release ‘3.0.9‘
ERROR: You may try the upgrade command
大概的意思就是:经检验器pacemaker-2.0检查后发现crm shell版本相对较低,不被CIB(集群信息库)支持,因此建议更新crmsh版本;
其实如果我们执行 cibadmin –query | grep validate 就可看到这条信息:
<cib crm_feature_set=”3.0.9″ validate-with=”pacemaker-2.0″
为解决此问题,可尝试另一个办法,将检验器的版本降低:
cibadmin –modify –xml-text ‘<cib validate-with=”pacemaker-1.2″/>‘
经测试,使用此方法后故障解除
⑷配置高可用集群
◆配置集群工作属性
本例中只有两个节点,没有stonith设备和仲裁设备,而corosync默认启用了stonith。启用stonith而又没有配置相应的stonith设备时,corosync是不允许资源启动的,通过以下命令就可得知:
crm_verify -L -V
因此,我们需要做如下设定:
crm configure property stonith-enabled=false
crm configure property no-quorum-policy=ignore
[root@node2 ~]# crm_verify -L -V
error: unpack_resources: Resource start-up disabled since no STONITH resources have been defined
error: unpack_resources: Either configure some or disable STONITH with the stonith-enabled option
error: unpack_resources: NOTE: Clusters with shared data need STONITH to ensure data integrity
Errors found during check: config not valid
[root@node2 ~]# crm configure property stonith-enabled=false
[root@node2 ~]# crm configure property no-quorum-policy=ignore
[root@node2 ~]# crm configure show
node node1
node node2
property $id=”cib-bootstrap-options” \
dc-version=”1.1.11-97629de” \
cluster-infrastructure=”classic openais (with plugin)” \
expected-quorum-votes=”2″ \
stonith-enabled=”false” \
no-quorum-policy=”ignore”
[root@node2 ~]# crm_verify -L -V
[root@node2 ~]#
◆配置集群资源
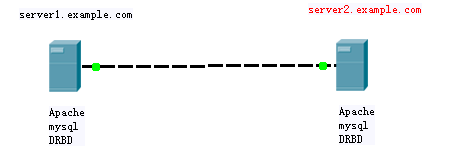
mysqld和drbd是我们要定义的集群服务,先要确保两个节点上的服务停止且不会开机自动启动:
service mysqld stop;chkconfig mysqld off
service drbd stop;chkconfig drbd off
drbd需要同时运行在两个节点上,且一个节点是Master,另一个节点为Slave(primary/secondary模型);因此,要将其配置为主从资源(特殊的克隆资源),且要求服务刚启动时两个节点都处于slave状态
drbd的RA目前由OCF归类为linbit,其路径为/usr/lib/ocf/resource.d/linbit/drbd
⊕配置资源:
primitive myip ocf:heartbeat:IPaddr params ip=192.168.30.100 op monitor interval=30s timeout=20s
primitive mydrbd ocf:linbit:drbd params drbd_resource=mysql op monitor role=Master interval=10s timeout=20s op monitor role=Slave interval=20s timeout=30s op start timeout=240s op stop timeout=100s
主从资源是从一个主资源克隆而来,所以要先配置一个主资源
ms ms_mydrbd mydrbd meta master-max=1 master-node-max=1 clone-max=2 clone-node-max=1[ notify=True]
ms表示配置主从资源,ms_mydrbd为主从资源的名称,后面的mydrbd表示要克隆的资源
clone-max:在集群中最多能运行多少份克隆资源,默认和集群中的节点数相同;
clone-node-max:每个节点上最多能运行多少份克隆资源,默认是1;
notify:当成功启动或关闭一份克隆资源,要不要通知给其它的克隆资源,默认是true
primitive mystore ocf:heartbeat:Filesystem params device=/dev/drbd0 directory=/mydata fstype=ext4 op monitor interval=20s timeout=60s op start timeout=60s op stop timeout=60s
primitive myserver lsb:mysqld op monitor interval=20s timeout=20s
⊕定义约束:
group myservice myip mystore myserver
collocation mystore_with_ms_mydrbd_master inf: mystore ms_mydrbd:Master
存储设备需要跟随drbd的主节点,且只能在drbd服务将该节点提升为主节点后才可启动
order mystore_after_ms_mydrbd_master mandatory: ms_mydrbd:promote mystore
order myserver_after_mystore mandatory: mystore myserver
order myserver_after_myip inf: myip myserver
⊕stickness
资源在节点间每一次的来回流动都会造成那段时间内其无法正常被访问,所以,我们有时候需要在资源因为节点故障转移到其它节点后,即便原来的节点恢复正常也禁止资源再次流转回来。这可以通过定义资源的黏性(stickiness)来实现
stickness取值范围:
0:默认值,资源放置在系统中的最适合位置
大于0:值越高表示资源越愿意留在当前位置
小于0:绝对值越高表示资源越愿意离开当前位置
INFINITY:如果不是因节点不适合运行资源(节点关机、节点待机、达到migration-threshold 或配置更改)而强制资源转移,资源总是留在当前位置
-INFINITY
可以通过以下方式为资源指定默认黏性值:
crm configure rsc_defaults resource-stickiness=100
#准备工作
[root@node2 ~]# service mysqld stop
Stopping mysqld: [ OK ]
[root@node2 ~]# umount /mydata
[root@node2 ~]# drbdadm secondary mysql
[root@node2 ~]# cat /proc/drbd
version: 8.4.3 (api:1/proto:86-101)
GIT-hash: 89ab68adb3ee85a73221f964d3ee515 build by gardner@, 2013-11-29 12:28:00
0: cs:Connected ro:Secondary/Secondary ds:UpToDate/UpToDate C r—–
ns:124 nr:0 dw: dr: al:7 bm:396 lo:0 pe:0 ua:0 ap:0 ep:1 wo:f oos:0
[root@node2 ~]# service drbd stop;ssh root@node1 ‘service drbd stop‘
Stopping all DRBD resources: .
Stopping all DRBD resources: .
[root@node2 ~]# chkconfig mysqld off;ssh root@node1 ‘chkconfig mysqld off‘
[root@node2 ~]# chkconfig drbd off;ssh root@node1 ‘chkconfig drbd off‘
#配置资源
crm(live)configure# primitive myip ocf:heartbeat:IPaddr params ip=192.168.30.100 op monitor interval=30s timeout=20s
crm(live)configure# primitive mydrbd ocf:linbit:drbd params drbd_resource=mysql op monitor role=Master interval=10s timeout=20s op monitor role=Slave interval=20s timeout=30s op start timeout=240s op stop timeout=100s
crm(live)configure# ms ms_mydrbd mydrbd meta master-max=1 master-node-max=1 clone-max=2 clone-node-max=1 notify=True
crm(live)configure# primitive mystore ocf:heartbeat:Filesystem params device=/dev/drbd0 directory=/mydata fstype=ext4 op monitor interval=20s timeout=60s op start timeout=60s op stop timeout=60s
crm(live)configure# primitive myserver lsb:mysqld op monitor interval=20s timeout=20s
#定义约束
crm(live)configure# group myservice myip mystore myserver
crm(live)configure# collocation mystore_with_ms_mydrbd_master inf: mystore ms_mydrbd:Master
crm(live)configure# order mystore_after_ms_mydrbd_master mandatory: ms_mydrbd:promote mystore
crm(live)configure# order myserver_after_mystore mandatory: mystore myserver
crm(live)configure# order myserver_after_myip inf: myip myserver
crm(live)configure# verify #语法验证
crm(live)configure# commit #提交配置
crm(live)configure# show #查看配置信息
node node1
node node2
primitive mydrbd ocf:linbit:drbd \
params drbd_resource=”mysql” \
op monitor role=”Master” interval=”10s” timeout=”20s” \
op monitor role=”Slave” interval=”20s” timeout=”30s” \
op start timeout=”240s” interval=”0″ \
op stop timeout=”100s” interval=”0″
primitive myip ocf:heartbeat:IPaddr \
params ip=”192.168.30.100″ \
op monitor interval=”20s” timeout=”30s”
primitive myserver lsb:mysqld \
op monitor interval=”20s” timeout=”20s”
primitive mystore ocf:heartbeat:Filesystem \
params device=”/dev/drbd0″ directory=”/mydata” fstype=”ext4″ \
op monitor interval=”20s” timeout=”60s” \
op start timeout=”60s” interval=”0″ \
op stop timeout=”60s” interval=”0″
group myservice myip mystore myserver
ms ms_mydrbd mydrbd \
meta master-max=”1″ master-node-max=”1″ clone-max=”2″ clone-node-max=”1″ notify=”True”
colocation mystore_with_ms_mydrbd_master inf: mystore ms_mydrbd:Master
order myserver_after_myip inf: myip myserver
order myserver_after_mystore inf: mystore myserver
order mystore_after_ms_mydrbd_master inf: ms_mydrbd:promote mystore
property $id=”cib-bootstrap-options” \
dc-version=”1.1.11-97629de” \
cluster-infrastructure=”classic openais (with plugin)” \
expected-quorum-votes=”2″ \
stonith-enabled=”false” \
no-quorum-policy=”ignore”
crm(live)configure# cd
crm(live)# status #查看集群状态
Last updated: Fri Apr 29 13:43:06 2016
Last change: Fri Apr 29 13:42:23 2016
Stack: classic openais (with plugin)
Current DC: node2 – partition with quorum
Version: 1.1.11-97629de
2 Nodes configured, 2 expected votes
5 Resources configured
Online: [ node1 node2 ] #node1和node2均在线
Master/Slave Set: ms_mydrbd [mydrbd]
Masters: [ node1 ] #node1为mydrbd资源的主节点
Slaves: [ node2 ]
Resource Group: myservice #组中的各资源均正常启动
myip (ocf::heartbeat:IPaddr): Started node1
mystore (ocf::heartbeat:Filesystem): Started node1
myserver (lsb:mysqld): Started node1
#验证
[root@node1 ~]# ip addr show #使用ip addr查看配置的新的ip
…
2: eth0: <BROADCAST,MULTICAST,UP,LOWER_UP> mtu 1500 qdisc pfifo_fast state UP qlen 1000
link/ether 00:0c:29:40:35:9d brd ff:ff:ff:ff:ff:ff
inet 192.168.30.10/24 brd 192.168.30.255 scope global eth0
inet 192.168.30.100/24 brd 192.168.30.102 scope global secondary eth0
inet6 fe80::20c:29ff:fe40:359d/64 scope link
valid_lft forever preferred_lft forever
[root@node1 ~]# drbd-overview
0:mysql/0 Connected Primary/Secondary UpToDate/UpToDate C r—– /mydata ext4 2.0G 89M 1.8G 5%
[root@node1 ~]# ls /mydata
binlogs data lost+found
[root@node1 ~]# service mysqld status
mysqld (pid 65079) is running…
[root@node1 ~]# mysql
…
mysql> create database testdb; #创建一个新库
Query OK, 1 row affected (0.08 sec)
mysql> exit
Bye
模拟故障
[root@node1 ~]# service mysqld stop #手动停止mysqld服务
Stopping mysqld: [ OK ]
[root@node1 ~]# crm status
…
Online: [ node1 node2 ]
Master/Slave Set: ms_mydrbd [mydrbd]
Masters: [ node1 ]
Slaves: [ node2 ]
Resource Group: myservice
myip (ocf::heartbeat:IPaddr): Started node1
mystore (ocf::heartbeat:Filesystem): Started node1
myserver (lsb:mysqld): Started node1
Failed actions:
myserver_monitor_20000 on node1 ‘not running‘ (7): call=70, status=complete, last-rc-change=‘Fri Apr 29 23:00:55 2016‘, queued=0ms, exec=0ms
#因为我们有监控资源,当pacemaker发现资源状态异常时,会尝试重新启动资源,若启动失败会尝试转移到对方节点
[root@node1 ~]# service mysqld status #可以看到服务已自动重新启动
mysqld (pid 4783) is running…
模拟资源转移
crm(live)# node standby #强制资源转移
crm(live)# status
…
Node node1: standby
Online: [ node2 ]
Master/Slave Set: ms_mydrbd [mydrbd]
Slaves: [ node1 node2 ]
Resource Group: myservice
myip (ocf::heartbeat:IPaddr): Started node2
mystore (ocf::heartbeat:Filesystem): FAILED node2
myserver (lsb:mysqld): Stopped
Failed actions: #显示有错误信息
mystore_start_0 on node2 ‘unknown error‘ (1): call=236, status=complete, last-rc-change=‘Fri Apr 29 15:45:17 2016‘, queued=0ms, exec=69ms
mystore_start_0 on node2 ‘unknown error‘ (1): call=236, status=complete, last-rc-change=‘Fri Apr 29 15:45:17 2016‘, queued=0ms, exec=69ms
crm(live)# resource cleanup mystore #清理资源mystore的状态
Cleaning up mystore on node1
Cleaning up mystore on node2
Waiting for 2 replies from the CRMd.. OK
crm(live)# status #恢复正常,可以看到资源已成功转移至node2
…
Node node1: standby
Online: [ node2 ]
Master/Slave Set: ms_mydrbd [mydrbd]
Masters: [ node2 ]
Stopped: [ node1 ]
Resource Group: myservice
myip (ocf::heartbeat:IPaddr): Started node2
mystore (ocf::heartbeat:Filesystem): Started node2
myserver (lsb:mysqld): Started node2
crm(live)# node online #让node1重新上线
#验证
[root@node2 ~]# ip addr show
…
2: eth0: <BROADCAST,MULTICAST,UP,LOWER_UP> mtu 1500 qdisc pfifo_fast state UP qlen 1000
link/ether 00:0c:29:bd:68:23 brd ff:ff:ff:ff:ff:ff
inet 192.168.30.20/24 brd 192.168.30.255 scope global eth0
inet 192.168.30.100/24 brd 192.168.30.255 scope global secondary eth0
inet6 fe80::20c:29ff:febd:6823/64 scope link
valid_lft forever preferred_lft forever
[root@node2 ~]# mysql
…
mysql> show databases; #以node2上可以看到刚才在node1上创建的新库
+——————–+
| Database |
+——————–+
| information_schema |
| hellodb |
| mysql |
| test |
| testdb |
+——————–+
5 rows in set (0.16 sec)
mysql>
发布者:全栈程序员-站长,转载请注明出处:https://javaforall.net/232386.html原文链接:https://javaforall.net


