
参考:腾讯云手动实验
Firekylin 是一款基于 ThinkJS 开发的开源 NodeJS 博客系统,从零开始快速搭建自己的 Firekylin
个人博客,了解更多内容可参见 https://firekylin.org。
运行环境准备
安装Node.js
[root@localhost ~]# curl --silent --location https://rpm.nodesource.com/setup_8.x | sudo bash -
[root@localhost ~]# yum -y install nodejs
npm安装PM2
通过 NPM 安装进程管理模块 PM2。它是 Node.js 的一个进程管理模块,之后会使用它来管理个人网站进程。
[root@localhost ~]# npm install pm2 -g
安装MySQL
[root@localhost ~]# wget http://dev.mysql.com/get/mysql-community-release-el7-5.noarch.rpm
[root@localhost ~]# rpm -ivh mysql-community-release-el7-5.noarch.rpm
[root@localhost ~]# yum -y install mysql-community-server
启动MySQL服务
[root@localhost ~]# systemctl start mysqld
# 授权
[root@localhost ~]# mysql
mysql> grant all on *.* to 'root'@'localhost' identified by '123.com';
安装nginx
[root@localhost ~]# yum -y install epel-release
[root@localhost ~]# yum -y install nginx
安装配置Firekylin
安装Firekylin
# 如果wget不到这个安装包,就直接复制连接到浏览器下载,或者放在迅雷上进行下载
[root@localhost ~]# wget http://firekylin.org/release/latest.tar.gz
解压安装
[root@localhost ~]# tar zxf latest.tar.gz
# 安装依赖
[root@localhost ~]# cd firekylin/
[root@localhost firekylin]# npm install
复制配置文件
[root@localhost firekylin]# mv pm2_default.json pm2.json
[root@localhost firekylin]# vim pm2.json
# 修改cwd路径为Firekylin的路径
    "cwd": "/root/firekylin",
启动项目
[root@localhost firekylin]# pm2 startOrReload pm2.json
[PM2][WARN] Applications firekylin not running, starting...
[PM2] App [firekylin] launched (1 instances)
┌────┬────────────────────┬──────────┬──────┬───────────┬──────────┬──────────┐
│ id │ name               │ mode     │ ↺    │ status    │ cpu      │ memory   │
├────┼────────────────────┼──────────┼──────┼───────────┼──────────┼──────────┤
│ 0  │ firekylin          │ fork     │ 0    │ online    │ 0%       │ 12.7mb   │
└────┴────────────────────┴──────────┴──────┴───────────┴──────────┴──────────┘
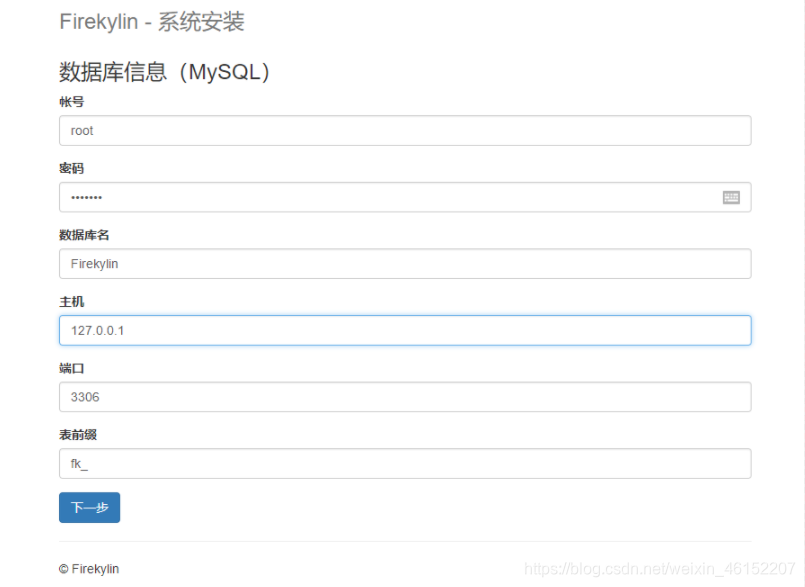
访问http://192.168.1.10:8360


使用nginx代理Firekylin
[root@localhost firekylin]# cp nginx_default.conf nginx.conf
[root@localhost firekylin]# vim nginx.conf
server {

    listen 80;
    server_name 192.168.1.10;  # 只需要修改这里为域名或者ip即可
    root /root/firekylin;
    set $node_port 8360;

    index index.js index.html index.htm;

    location ^~ /.well-known/acme-challenge/ {

      alias /root/firekylin/ssl/challenges/;
      try_files $uri = 404;
    }

    location / {

        proxy_http_version 1.1;
        proxy_set_header X-Real-IP $remote_addr;
        proxy_set_header X-Forwarded-For $proxy_add_x_forwarded_for;
        proxy_set_header Host $http_host;
        proxy_set_header X-NginX-Proxy true;
        proxy_set_header Upgrade $http_upgrade;
        proxy_set_header Connection "upgrade";
        proxy_pass http://192.168.1.1:$node_port$request_uri;
        proxy_redirect off;
    }

    location = /development.js {

        deny all;
    }
    location = /testing.js {

        deny all;
    }

    location = /production.js {

        deny all;
    }
}
软链配置文件
[root@localhost firekylin]# ln -s /root/firekylin/nginx.conf /etc/nginx/conf.d/firekylin.conf
启动nginx
[root@localhost ~]# systemctl start nginx
直接访问ip即可
版权声明:本文内容由互联网用户自发贡献,该文观点仅代表作者本人。本站仅提供信息存储空间服务,不拥有所有权,不承担相关法律责任。如发现本站有涉嫌侵权/违法违规的内容, 请联系我们举报,一经查实,本站将立刻删除。
发布者:全栈程序员-站长,转载请注明出处:https://javaforall.net/101909.html原文链接:https://javaforall.net


