
大家好,又见面了,我是全栈君。
在android启动过程中,首先启动的便是uboot,uboot是负责引导内核装入内存启动或者是引导recovery模式的启动。现在在很多android的uboot的启动过程中,都需要对内核镜像和ramdisk进行验证,来保证android系统的安全性,如果在uboot引导过程中,如果内核镜像或ramdisk刷入的是第三方的未经过签名认证的相关镜像,则系统无法启动,这样便保证了android系统的安全性。
在uboot启动过程中,是从start.S开始的,这里详细的细节不在赘述了,该篇文章主要学习uboot对内核镜像和ramdisk镜像的验证启动过程,同时学习一下里面的优秀巧妙的编码方式。
我们从arch/arm/lib/board.c的函数board_init_r函数开始,我们来看一下该代码:
    void board_init_r(gd_t *id, ulong dest_addr)
    {
        gd = id;

        gd->flags |= GD_FLG_RELOC;  /* tell others: relocation done */

        monitor_flash_len = _end_ofs;

        debug("monitor flash len: %08lX\n", monitor_flash_len);
        board_init();   /* Setup chipselects */

    #if defined(CONFIG_MISC_INIT_R)
        /* miscellaneous platform dependent initialisations */
        misc_init_r();
    #endif

    #if defined(CONFIG_USE_IRQ)
        /* set up exceptions */
        interrupt_init();

        /* enable exceptions */
        enable_interrupts();
        printf("init interrupt done!\n");
    #endif

    #if defined(CONFIG_COMIP_FASTBOOT) && defined(CONFIG_LCD_SUPPORT)
        if (gd->fastboot) {
        /*register lcd support*/
    #if defined (CONFIG_LCD_AUO_OTM1285A_OTP)
            extern int lcd_auo_otm1285a_otp_init(void);
            lcd_auo_otm1285a_otp_init();
    #endif
    #if defined (CONFIG_LCD_AUO_R61308OTP)
            extern int lcd_auo_r61308opt_init(void);
            lcd_auo_r61308opt_init();
    #endif
    #if defined (CONFIG_LCD_AUO_NT35521)
            extern int lcd_auo_nt35521_init(void);
            lcd_auo_nt35521_init();
    #endif
    #if defined (CONFIG_LCD_SHARP_R69431)
            extern int lcd_sharp_eR69431_init(void);
            lcd_sharp_eR69431_init();
    #endif
            /*initialize lcdc & display logo*/
            extern int comipfb_probe(void);
            comipfb_probe();
        }
    #endif

    #if defined(CONFIG_COMIP_TARGETLOADER)
        extern int targetloader_init(void);
        targetloader_init();
    #elif defined(CONFIG_COMIP_FASTBOOT)
        if (gd->fastboot) {
            extern int fastboot_init(void);
            fastboot_init();
            while(1);
        }
    #endif

    #if defined(CONFIG_ENABLE_SECURE_VERIFY_FOR_BOOT)
            extern  int secure_verify(void);
            extern void pmic_power_off(void);
            if(secure_verify()) {
                    printf("Secure verify failed! Shutdown now!\n");
                    pmic_power_off();
            } else {
                    printf("Secure verify succeed!\n");
            }
    #endif

        do_bootm_linux();

        /* main_loop() can return to retry autoboot, if so just run it again. */
        for (;;) {
            //main_loop();
        }

        /* NOTREACHED - no way out of command loop except booting */
    }
首先该函数做的是初始化board,调用board_init()函数。该函数位于board/****/***.c文件中,该文件由于属于板子厂家,所以暂时保密。我们来看一下这个函数:
    int board_init(void)
    {
        gd->bd->bi_arch_number = MACH_TYPE_LC186X;
        gd->bd->bi_boot_params = CONFIG_BOOT_PARAMS_LOADADDR;

    #ifndef CONFIG_COMIP_TARGETLOADER
        tl420_init();

        watchdog_init();

        comip_lc186x_coresight_config();

        comip_lc186x_sysclk_config();

        comip_lc186x_sec_config();

        comip_lc186x_bus_prior_config();
    #endif

    #if defined(COMIP_LOW_POWER_MODE_ENABLE)
        comip_lp_regs_init();
    #endif
        icache_enable();
        //dcache_enable();
    #if CONFIG_COMIP_EMMC_ENHANCE
        mmc_set_dma(1);
    #endif
        flash_init();

    #ifndef CONFIG_COMIP_TARGETLOADER
        pmic_power_on_key_check();
        boot_image();
        pmic_power_on_key_check();
    #endif

    #ifdef CONFIG_PMIC_VIBRATOR
        pmic_vibrator_enable_set();
    #endif

        return 0;
    }
在该函数中,主要是用于初始化一些参数和硬件,包括arch版本号,boot加载地址,初始化watchdog,系统时钟,总线,flash,同时还需要做的就是,我们开机时的按钮监听,组合键按钮监听,启动镜像,开机震动等操作,在这里我们看一下boot_image()函数的实现。
    static void boot_image(void)
    {
        char *kernel_name = CONFIG_PARTITION_KERNEL;
        char *ramdisk_name = CONFIG_PARTITION_RAMDISK;
        int pu_reason;
        int key_code;
        int ret;

        pu_reason = pmic_power_up_reason_get();
        if ((pu_reason == PU_REASON_REBOOT_RECOVERY)
                || (pu_reason == PU_REASON_REBOOT_FOTA)
                || check_recovery_misc() || check_recovery_fota()) {
            gd->boot_mode = BOOT_MODE_RECOVERY;
            ramdisk_name = CONFIG_PARTITION_RAMDISK_RECOVERY;
    #if defined(CONFIG_USE_KERNEL_RECOVERY)
            kernel_name = CONFIG_PARTITION_KERNEL_RECOVERY;
    #endif
        } else {
            ret = keypad_init();
            if (ret)
                printf("keypad init failed!\n");

            key_code = keypad_check();
            printf("key code: %d\n", key_code);

             if(pu_reason == PU_REASON_USB_CHARGER
                #if defined(CONFIG_COMIP_FASTBOOT)
                    && key_code != CONFIG_KEY_CODE_FASTBOOT
                #endif
            ) {
                gd->boot_mode = BOOT_MODE_NORMAL;
                ramdisk_name = CONFIG_PARTITION_RAMDISK_AMT1;
            } else {
                switch (key_code) {
                case KEY_CODE_RECOVERY:
                    gd->boot_mode = BOOT_MODE_RECOVERY;
                    ramdisk_name = CONFIG_PARTITION_RAMDISK_RECOVERY;
                    #if defined(CONFIG_USE_KERNEL_RECOVERY)
                    kernel_name = CONFIG_PARTITION_KERNEL_RECOVERY;
                    #endif
                    break;
                #if defined(CONFIG_USE_RAMDISK_AMT3)
                case KEY_CODE_AMT3:
                    gd->boot_mode = BOOT_MODE_AMT3;
                    ramdisk_name = CONFIG_PARTITION_RAMDISK_AMT3;
                    break;
                #endif
                default:
                    gd->boot_mode = BOOT_MODE_NORMAL;
                    ramdisk_name = CONFIG_PARTITION_RAMDISK;
                    break;
                }

                #if defined(CONFIG_COMIP_FASTBOOT)
                if (key_code == CONFIG_KEY_CODE_FASTBOOT) {
                    printf("goto fastmode!\n");
                    gd->fastboot = 1;
                }
                #endif
            }
        }

        printf("kernel name: %s, ramdisk name: %s\n", kernel_name, ramdisk_name);

        flash_partition_read(kernel_name, (u8*)(CONFIG_KERNEL_LOADADDR - IMAGE_ADDR_OFFSET), 0xffffffff);

        flash_partition_read(ramdisk_name, (u8*)(CONFIG_RAMDISK_LOADADDR - IMAGE_ADDR_OFFSET), 0xffffffff);

    #if defined(CONFIG_COMIP_FASTBOOT) && defined(CONFIG_LCD_SUPPORT)
        if (unlikely(gd->fastboot))
            flash_partition_read(CONFIG_PARTITION_FASTBOOT_LOGO, (u8*)(unsigned int)gd->fb_base, CONFIG_FB_MEMORY_SIZE);
        else
            flash_partition_read(CONFIG_PARTITION_LOGO, (u8*)(unsigned int)gd->fb_base, CONFIG_FB_MEMORY_SIZE);
    #else
        flash_partition_read(CONFIG_PARTITION_LOGO, (u8*)(unsigned int)gd->fb_base, CONFIG_FB_MEMORY_SIZE);
    #endif

        printf("boot image end\n");
    }
    #endif /* !CONFIG_COMIP_TARGETLOADER */
在这里首先需要确定内核镜像和ramdisk镜像的地址,然后初始化按钮监听,根据不同的按钮组合按键启动不同的镜像,包括正常启动,也就是说启动内核,启动android;启动recovery镜像;启动工厂模式等。将这些镜像数据读取进入flash中引导启动。
接着我们回到board.c,程序接着运行,接着初始化misc,初始化中断,使能中断;同时在这里判断是否进去fastboot模式。接着,进入我们的重点,也就是安全启动验证阶段。
    #if defined(CONFIG_ENABLE_SECURE_VERIFY_FOR_BOOT)
            extern  int secure_verify(void);
            extern void pmic_power_off(void);
            if(secure_verify()) {
                    printf("Secure verify failed! Shutdown now!\n");
                    pmic_power_off();
            } else {
                    printf("Secure verify succeed!\n");
            }
    #endif
在这里,我们刚刚说了,已经把相应的内核镜像数据和ramdisk镜像数据读入到flash中了。
那么uboot又是如何验证内核镜像和ramdisk镜像的呢?我们接着看。
我们先来看函数secure_verify()函数。
    int secure_verify(void)
    {
            getverifyimage(VERIFY_KERNEL);
            if (image_rsa_verify()) {
                    printf("kernel verify failed!\n");
                    return 1;
            } else {
                    printf("kernel verify ok!\n");
                    getverifyimage(VERIFY_RAMDISK);
                    if(image_rsa_verify()) {
                            printf("ramdisk verify failed!\n");
                            return 1;
                    } else {
                            printf("ramdisk verify ok!\n");
                    }
            }
            return 0;
    }
在这段代码中,我们可以看出,首先是获取内核镜像数据,然后进行rsa签名验证,接着获取ramdisk镜像数据,接着进行签名验证。
我们来看一下如何获取内核镜像数据或者是ramdisk镜像数据,也就是getverifyimage()函数。
    void getverifyimage(int whichimage)
    {
            int i;
            unsigned int *cfgInfor = image_data_all;
            int ret;

            if(whichimage == VERIFY_KERNEL) {
                    image_data_all = CONFIG_KERNEL_LOADADDR - HEADINFOLEN;
            } else if(whichimage == VERIFY_RAMDISK) {
                    image_data_all = CONFIG_RAMDISK_LOADADDR - HEADINFOLEN;
            }
            cfgInfor = (unsigned int *)image_data_all;
            ORIGIN_IMAGE_LEN =  cfgInfor[0];

            for(i=0; i<(256/4); i++)
            {
                    RSASIGNATURE[i] = cfgInfor[i + (RSASIGNEDLEN / 4)];
            }

            for(i=0; i<(524/4); i++)
            {
                    RSAPUBKEYSTRU[i] = cfgInfor[i + (RSAPUBKEYLEN / 4)];
        }

            ORIGIN_IMAGE_BASEADDR = &image_data_all[HEADINFOLEN];

    #if defined(CONFIG_ENABLE_SECURE_VERIFY_DEBUG)
            printf("image len:0x%x(%d)\n", ORIGIN_IMAGE_LEN, ORIGIN_IMAGE_LEN);

            dumphex("rsa pub key", RSAPUBKEYSTRU, 524/4);
            dumpint("rsa pub key", RSAPUBKEYSTRU, 524/4);
    #endif
    }
我们以内核启动验证为例进行讲解,ramdisk是一样的。我先来画一下内核镜像数据在flash中的分布,这样分析起代码来便会更容易理解。

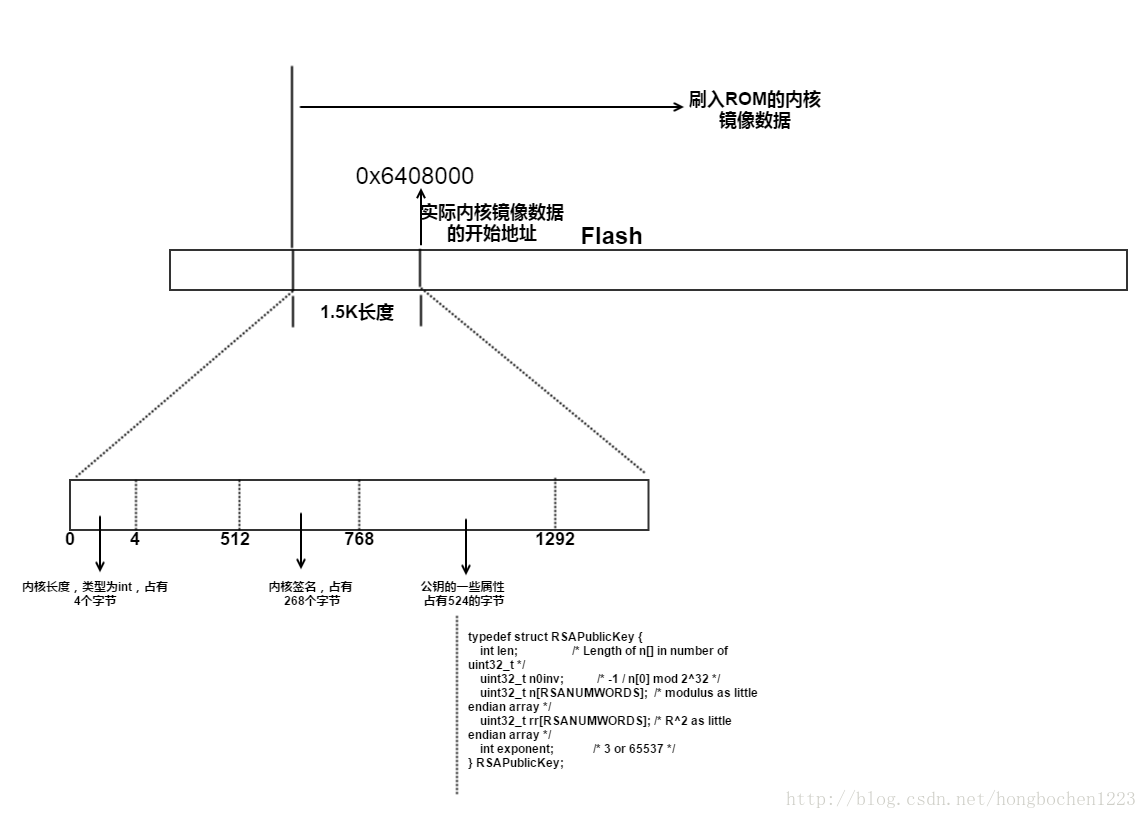
首先我们需要了解的是,我们刷入的内核镜像并不是可运行的内核镜像,因为我们在真正的内核镜像之前加入了一个小小的1.5K的头,该头里面包含了内核的大小,经过私钥对内核签名后的签名,以及需要使用的公钥生成的一些属性。所以在该获取镜像的函数中,我们获取了所有的内核镜像数据,内核镜像大小,签名数据以及公钥属性数据。
下面我们就需要对其进行rsa验证。
      /****************************************************** Let image to do RSA verify. If verify OK, return 0. Otherwise, return 1. *******************************************************/
    int image_rsa_verify(void)
    {
                    unsigned int value, i;
                    unsigned char *image_sha256;
                    unsigned char *signature;
                    RSAPublicKey *public_key;
                    SHA256_CTX ctx;

                    updateNum = 0;
                    value = rsaPubKey_sha256_verify();
                    if(value == 1)
                            return 1;

                    updateNum = 0;
                    image_sha256 = (unsigned char*)SHA256_hash(ORIGIN_IMAGE_BASEADDR, ORIGIN_IMAGE_LEN, image_sha256, &ctx);

    #if defined(CONFIG_ENABLE_SECURE_VERIFY_DEBUG)
                    dumphex("current image hash", uboot_sha256, 32);
    #endif

                    for(i=0; i<32; i++)
                            ORIGIN_IMAGE_SHA[i] = image_sha256[i];

                    updateNum = 0;
                    signature = (unsigned char*)RSASIGNATURE;
                    public_key = (RSAPublicKey *)RSAPUBKEYSTRU;
                    value = RSA_verify(public_key, signature, 256, ORIGIN_IMAGE_SHA, 32);

                    if(value == 0)
                            return 1;
                    return 0;
    }
通过这个函数可以看到,对内核进行了两次验证,一次是通过函数rsaPubKey_sha256_verify()进行验证,另外一个是通过RSA_verify进行验证,我们先来看第一个:
      /****************************************************
                    Use SHA256 to generate digest of RSA pub-key,
                    which is 524 BYTES. Then compare the digest
                    with the original digest which is store in the
                    EFUSE. If the new digest equals original digest,
                    it means RSA pub-key is right. Otherwise, means
                    the RSA pub-key is wrong.
    *****************************************************/
    int rsaPubKey_sha256_verify(void)
    {
            unsigned int *digest, origDigest[8], i, result;
            unsigned char *newDigest;
            SHA256_CTX ctx;
            digest = (unsigned int *)SHA256_hash(RSAPUBKEYSTRU, 524, newDigest, &ctx);
    #if 1
            origDigest[0] = *RSA_SIGNATURE0;
            origDigest[1] = *RSA_SIGNATURE1;
            origDigest[2] = *RSA_SIGNATURE2;
            origDigest[3] = *RSA_SIGNATURE3;
            origDigest[4] = *RSA_SIGNATURE4;
            origDigest[5] = *RSA_SIGNATURE5;
            origDigest[6] = *RSA_SIGNATURE6;
            origDigest[7] = *RSA_SIGNATURE7;
    #else
            origDigest[0] = rsahash[0];
            origDigest[1] = rsahash[1];
            origDigest[2] = rsahash[2];
            origDigest[3] = rsahash[3];
            origDigest[4] = rsahash[4];
            origDigest[5] = rsahash[5];
            origDigest[6] = rsahash[6];
            origDigest[7] = rsahash[7];
    #endif
    #if defined(CONFIG_ENABLE_SECURE_VERIFY_DEBUG)
            dumphex("pubkey hash", digest, 32);
            dumphex("read pubkey hash", origDigest, 32);
    #endif
            //new key and old key xor
    #if defined(CONFIG_ENABLE_SECURE_VERIFY_DEBUG)
            printf("read pubkey hash:\n");
    #endif
            for(i=0; i<8; i++)
            {
    #if defined(CONFIG_ENABLE_SECURE_VERIFY_DEBUG)
                printf("%08x ", origDigest[i]);
    #endif
                result = ((origDigest[i]) ^ (digest[i]));
                if(result != 0) {
    #if defined(CONFIG_ENABLE_SECURE_VERIFY_DEBUG)
                    printf("ERROR! %s %d\n", __func__,__LINE__);
    #endif
                    return 1;
                }
            }

    #if defined(CONFIG_ENABLE_SECURE_VERIFY_DEBUG)
                    dumphex("pubkey hash", digest, 32);
    #endif
                    return 0;
这里是对公钥进行sha256签名来验证公钥是否是对的,具体的函数实现不再学习。
接着通过对内核镜像数据进行sha256获取哈希,然后,使用公钥和签名进行签名验证,验证内核镜像数据是否是正确的。这样,通过这两步,必须两步都对,才能进行内核的正常加载和运行。
ramdisk镜像的签名验证也是如何,对内核镜像和ramdisk镜像签名验证之后,接着执行下面的操作,也就是执行do_bootm_linux()函数,该函数的实现如下:
      void do_bootm_linux(void)
    {
        bd_t *bd = gd->bd;
        void (*theKernel) (int zero, int arch, uint params);
        theKernel = (void (*)(int, int, uint))CONFIG_KERNEL_LOADADDR;

        params = (struct tag *)bd->bi_boot_params;

        params->hdr.tag = ATAG_CORE;
        params->hdr.size = tag_size(tag_core);
        params->u.core.flags = 0;
        params->u.core.pagesize = 0;
        params->u.core.rootdev = 0;
        params = tag_next(params);

        params = comip_set_boot_params(params);

        params->hdr.tag = ATAG_NONE;
        params->hdr.size = 0;

        /* we assume that the kernel is in place */
        printf("\nStarting kernel ...\n");
        cleanup_before_linux();
        theKernel(0, bd->bi_arch_number, bd->bi_boot_params);
    }
在这里实际上就是通过一个theKernel函数指针,加载内核启动运行,这样,便进行内核的启动运行了。
这样,我们便把uboot的启动流程以及对内核和ramdisk进行启动验证的过程进行了一个整体的学习,其内部的RSA算法实现不再赘述。
转载于:https://www.cnblogs.com/bobo1223/p/7287452.html
发布者:全栈程序员-站长,转载请注明出处:https://javaforall.net/108567.html原文链接:https://javaforall.net


