
JUnit3与JUnit4区别
- Junit3:
- 测试用例必须是公共类;
- 测试用例必须继承类
TestCase; - 测试用例的测试方法必须是公有的;
- 测试用例的测试方法必须被声明为void;
- 测试用例的测试方法的前置名词必须是test;
- 测试用例的测试方法无任何参数传递;
- Junit4:
- 测试类不需要继承
TestCase; - 测试方法命名没有特定要求,只要在待测方法前加上
@Test即可; - 通过
@before替代setUp方法,@After替代tearDown方法;
在一个测试类中,甚至可以使用多个@Before来注释多个方法,这些方法都是在每个测试之前运行。说明一点,@Before是在每个测试方法运行前均初始化一次,同理@After是在每个测试方法运行完毕后均运行一次,也就是说,经过这两个注释的初始化和注销,可以保证各个测试方法之间的独立性而互不干扰,它的缺点是效率低。
在JUnit4中加入了一项新特性。加入了两个注释:@BeforeClass和@AfterClass,使用这两个注释的方法,在该测试类中方法的测试之前、后各运行一次,而不是按照各个方法各运行一次。对于一些资源消耗大的项目,可以使用这两个注释。 - 此外Junit4还可以进行异常测试(
@Test(expected=*.class))和超时测试(@Test(timeout=xxx)),并且提供了一个新的assert方法:assertEquals(Object[] expected, Object[] actual),用于比较数组数据;
- 测试类不需要继承
JUnit3的使用
1 测试目标
package club.chuxing.junit3;

public class Calculator {

    public double add(double a, double b) {
        return a + b;
    }
    public double minus(double a, double b) {
        return a - b;
    }
    public double multiply(double a, double b) {
        return a * b;
    }
    public double divide(double a, double b) {
        return a / b;
    }
}
2 测试用例
TestCalculator.java:
package club.chuxing.junit3;

import junit.framework.TestCase;

public class TestCalculator extends TestCase{

    private Calculator calc;
    protected void setUp() throws Exception {
        super.setUp();
        calc = new Calculator();
    }
    protected void tearDown() throws Exception {
        super.tearDown();
    }
    public void testAdd() {
        assertEquals(3.0, calc.add(1, 2));
    }
    public void testMinus() {
        assertEquals(-1.0, calc.minus(1, 2));
    }
    public void testMultiply() {
        assertEquals(2.0, calc.multiply(1, 2));
    }
    public void testDivide() {
        assertEquals(0.5, calc.divide(1, 2));
    }
}
TestCalculator2.java:
package club.chuxing.junit3;

import junit.framework.TestCase;

public class TestCalculator2 extends TestCase{

    private Calculator calc;
    protected void setUp() throws Exception {
        super.setUp();
        calc = new Calculator();
    }
    protected void tearDown() throws Exception {
        super.tearDown();
    }
    public void testAdd() {
        assertEquals(4.0, calc.add(2, 2));
    }
    public void testMinus() {
        assertEquals(0.0, calc.minus(2, 2));
    }
    public void testMultiply() {
        assertEquals(4.0, calc.multiply(2, 2));
    }
    public void testDivide() {
        assertEquals(1.0, calc.divide(2, 2));
    }
}
3 测试单元
package club.chuxing.junit3;
import junit.framework.Test;
import junit.framework.TestSuite;
import junit.textui.TestRunner;
public class TestAll extends TestSuite {
public static Test suite() {
TestSuite suite = new TestSuite();
suite.addTestSuite(TestCalculator.class);
suite.addTestSuite(TestCalculator2.class);
return suite;
}
public static void main(String[] args) {
TestRunner.run(suite());
}
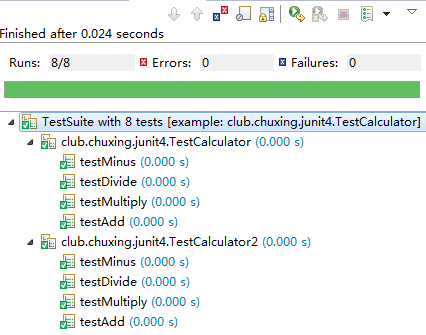
}运行结果:
........
Time: 0.009

OK (8 tests)
JUnit4的使用
CalculatorTest.java
package club.chuxing.junit4;
import static org.junit.Assert.*;
import org.junit.AfterClass;
import org.junit.BeforeClass;
import org.junit.Test;
public class CalculatorTest {
private static Calculator calc;
@BeforeClass
public static void setUpBeforeClass() throws Exception {
calc = new Calculator();
}
@AfterClass
public static void tearDownAfterClass() throws Exception {
}
@Test
public void testAdd() {
assertEquals(3, calc.add(1, 2), 0.00001);
}
@Test
public void testMinus() {
assertEquals(-1, calc.minus(1, 2), 0.00001);
}
@Test
public void testMultiply() {
assertEquals(2, calc.multiply(1, 2), 0.00001);
}
@Test
public void testDivide() {
assertEquals(0.5, calc.divide(1, 2), 0.00001);
}
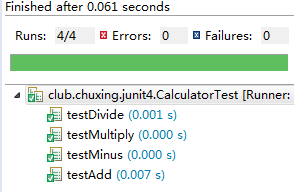
}运行结果:
转载:http://blog.csdn.net/foreverling/article/details/50452759
版权声明:本文内容由互联网用户自发贡献,该文观点仅代表作者本人。本站仅提供信息存储空间服务,不拥有所有权,不承担相关法律责任。如发现本站有涉嫌侵权/违法违规的内容, 请联系我们举报,一经查实,本站将立刻删除。
发布者:全栈程序员-站长,转载请注明出处:https://javaforall.net/109015.html原文链接:https://javaforall.net


