
大家好,又见面了,我是你们的朋友全栈君。如果您正在找激活码,请点击查看最新教程,关注关注公众号 “全栈程序员社区” 获取激活教程,可能之前旧版本教程已经失效.最新Idea2022.1教程亲测有效,一键激活。
Jetbrains全系列IDE稳定放心使用
Java 中的拷贝
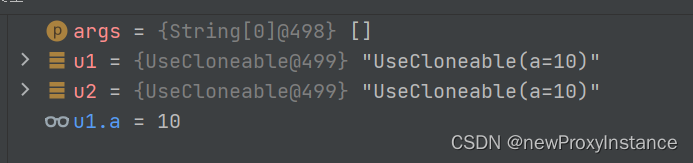
由于java中只有值传递,u2 = u1,拿到的是u1的地址,u2和u1指向的是同一个内存区域,u1改变值,u2也会改变。
        UseCloneable u1 = new UseCloneable();
        UseCloneable u2 = u1;
        u1.a = 10;

那么我们怎么构造一个新的对象呢
        u2 = new UseCloneable();
        u2.a = u1.a;
但是如果有20个30个字段,这么写就比较臃肿。
clone 方法 与 Cloneable 接口
通俗理解
实现该接口并重写方法来实现拷贝。没实现该接口调用clone方法会报错。
Ojbect类中的clone方法
访问修饰符为protected ,只能由子类或者同包的类调用。
protected native Object clone() throws CloneNotSupportedException;
我们尝试调用clone方法,会提示CloneNotSupportedException
public static void main(String[] args) throws CloneNotSupportedException{

        UseCloneable u1 = new UseCloneable();
        u1.clone();
-------
Exception in thread "main" java.lang.CloneNotSupportedException: com.example.miccommon.collection.UseCloneable
	at java.lang.Object.clone(Native Method)
	at com.example.miccommon.collection.UseCloneable.main(UseCloneable.java:16)
实现接口实现拷贝过程
@Data
public class UseCloneable implements Cloneable {
private int a;
private int b;
private int c;
private int d;
private int e;
private int f;
private int g;
public static void main(String[] args) throws CloneNotSupportedException {
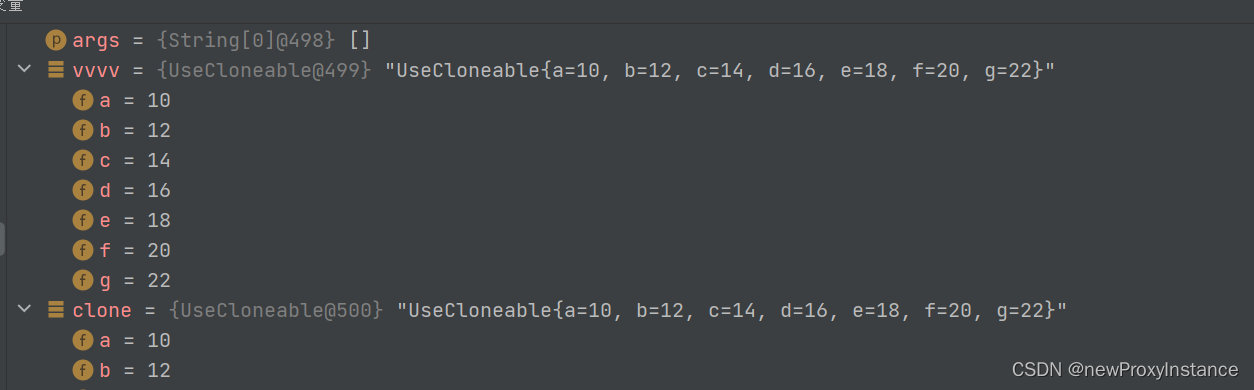
UseCloneable vvvv = new UseCloneable();
vvvv.setA(10);
vvvv.setB(12);
vvvv.setC(14);
vvvv.setD(16);
vvvv.setE(18);
vvvv.setF(20);
vvvv.setG(22);
UseCloneable clone = (UseCloneable) vvvv.clone();
System.out.println(clone);
}
@Override
public String toString() {
return "UseCloneable{" +
"a=" + a +
", b=" + b +
", c=" + c +
", d=" + d +
", e=" + e +
", f=" + f +
", g=" + g +
'}';
}
}
-------
UseCloneable{
a=10, b=12, c=14, d=16, e=18, f=20, g=22}
可以看到是两个不同的对象
重写clone方法,来自定义克隆内容。
  @Override
    protected Object clone() throws CloneNotSupportedException {

        UseCloneable clone = (UseCloneable) super.clone();
        clone.setA(999);
        return clone;
    }
-------
UseCloneable{
   a=999, b=12, c=14, d=16, e=18, f=20, g=22}
ArrayList 中相关的实现
public Object clone() {

        try {

            ArrayList<?> v = (ArrayList<?>) super.clone();
            v.elementData = Arrays.copyOf(elementData, size);
            v.modCount = 0;
            return v;
        } catch (CloneNotSupportedException e) {

            // this shouldn't happen, since we are Cloneable
            throw new InternalError(e);
        }
    }
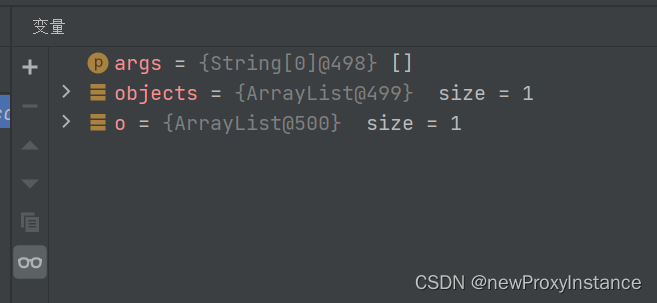
        ArrayList<Object> objects = new ArrayList<>();
        objects.add("123");
        Object o = objects.clone();
        System.out.println(o);
深拷贝
构造一个类Deep,通过clone拷贝。
@Data
public class UseCloneable implements Cloneable {


    Deep deep;


    public static void main(String[] args) throws CloneNotSupportedException {

        UseCloneable source = new UseCloneable();
        source.deep = new Deep();
        UseCloneable target = (UseCloneable) source.clone();
        System.out.println(target);
    }

}

class Deep {


}
虽然source和target已经不是同一个对象,但是两个对象中的deep都是同一个指向。

我们稍作改造来看看有什么影响,在Deep类中加入属性A。
@Data
public class UseCloneable implements Cloneable {


    Deep deep;

    public static void main(String[] args) throws CloneNotSupportedException {

        UseCloneable source = new UseCloneable();
        source.deep = new Deep();
        source.deep.setA(10);
        UseCloneable target = (UseCloneable) source.clone();
        System.out.println(target);
        source.deep.setA(5);
        System.out.println(target);
    }

}

@Data
class Deep {


    private int a ;

}
--------
UseCloneable(deep=Deep(a=10))
UseCloneable(deep=Deep(a=5))
对source的改动会影响到target中deep的字段,这样肯定是不合理的于是我们。
我们对代码进行改动
@Data
public class UseCloneable implements Cloneable {


    Deep deep;

    public static void main(String[] args) throws CloneNotSupportedException {

        UseCloneable source = new UseCloneable();
        source.deep = new Deep();
        source.deep.setA(10);
        UseCloneable target = (UseCloneable) source.clone();
        System.out.println(target);
        source.deep.setA(5);
        System.out.println(target);
    }

    @Override
    protected Object clone() throws CloneNotSupportedException {

        UseCloneable target = (UseCloneable) super.clone();
        Deep deep = target.getDeep();
        if (deep != null){

            Deep targetDeep = (Deep) target.getDeep().clone();
            target.setDeep(targetDeep);
        }
        return target;
    }
}

@Data
class Deep implements Cloneable {


    private int a;

    @Override
    protected Object clone() throws CloneNotSupportedException {

        return super.clone();
    }
}
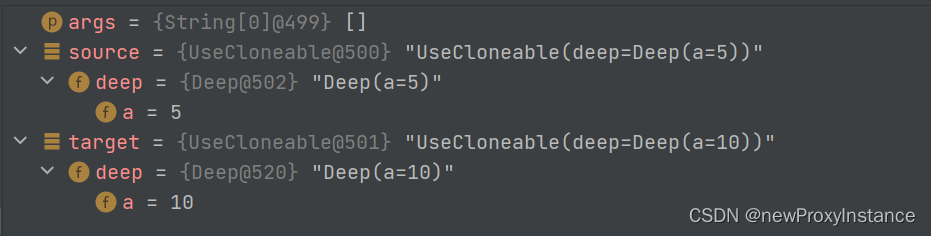
可以看到两个对象的deep的指向已经改变。
版权声明:本文内容由互联网用户自发贡献,该文观点仅代表作者本人。本站仅提供信息存储空间服务,不拥有所有权,不承担相关法律责任。如发现本站有涉嫌侵权/违法违规的内容, 请联系我们举报,一经查实,本站将立刻删除。
发布者:全栈程序员-站长,转载请注明出处:https://javaforall.net/182246.html原文链接:https://javaforall.net


